ShapeSync
Chapter 1: Installing and Configuring ShapeSync
This chapter explains the installation steps and initial project configuration required to start using ShapeSync in Unity.
1. Introduction (Glossary for Beginners)
Before proceeding with the installation steps, here is a simple explanation of commonly used technical terms.
- Package Manager: Unity’s standard tool for easily importing and managing extensions and external libraries.
- Scoped Registry: A registration setting to obtain packages from safe public servers other than official Unity registries.
- OpenUPM: A public registry service hosting many open-source packages for Unity.
- NuGet / NuGetForUnity: An extension tool that makes NuGet—the library distribution system widely used in the C# / .NET ecosystem—convenient to use in Unity.
- R3: A high-performance C# library for asynchronous processing and reactive programming (data change notifications and event management). ShapeSync uses it internally.
- URP (Universal Render Pipeline): Unity’s standard high-quality, high-performance rendering system. ShapeSync is designed exclusively for the URP environment.
- Graphics API (DirectX 12 / Vulkan / DirectX 11): The method used to send rendering commands to your computer’s graphics card (GPU). ShapeSync’s texture transformation requires DirectX 12 (D3D12) or Vulkan, which supports modern parallel processing (Async Compute).
- Color Space (Linear): The standard calculation used for brightness and color blending. ShapeSync’s material calculations are standardized to Linear.
- Asset Serialization Mode (Mixed): The format Unity uses to save asset data. It must be set to Mixed to handle ShapeSync’s large-capacity database.
- UniVRM: The standard package for handling VRM-format 3D avatars in Unity. This is only required if you use VRM integration.
- Scripting Define Symbols: Project-wide switches (flags) to enable specific features. Used when enabling VRM integration.
2. System Requirements
Ensure the following environment is prepared to run ShapeSync:
| Item | Requirement | Notes / Recommended Value |
|---|---|---|
| Unity Version | Unity 6.0 LTS or higher | Verification standard: Unity 6000.3.18f1 |
| Render Pipeline | Universal Render Pipeline (URP) 17.0.0 or higher | Verification standard: URP 17.3.0 (Built-in RP / HDRP / Custom SRP are not supported) |
| Graphics API | DirectX 12 or Vulkan | Async Compute Queue support is required (*D3D11 is not supported) |
| Git | Git 2.14 or higher | Required to fetch packages from GitHub via HTTPS |
| NuGetForUnity | 4.5.0 | Used to install .NET core dependencies for R3 |
| UniVRM | 0.131.1 | Required only when using VRM integration features |
3. Creating a Project and Recommended Template
When creating a new project in Unity Hub, it is strongly recommended to select the “Universal 3D” template.
[!TIP] Why the Universal 3D Template is Recommended In Unity 6 (
6000.3.18f1), the Universal 3D template comes with URP and Color Space set toLinearas initial settings. However, the placement and assignment of the URP Asset vary by Unity version and template, so do not assume a particular serialized assignment. Confirm the actual Graphics / Quality settings in Step 4.If you create a project from another template such as Built-in RP, follow the steps below to manually install and configure URP.
4. Step-by-Step Installation
The order of resolving dependencies is crucial when installing ShapeSync. Please follow Step 1 through Step 6 strictly in order (up to Step 8 if using VRM).
Step 1: Adding the OpenUPM Scoped Registry
Configure Unity to obtain related packages from OpenUPM.
- In the Unity Editor menu, open Edit > Project Settings.
- Select Package Manager from the left-side menu, enter the following information in the Scoped Registries list, and click Save.
Name: OpenUPM
URL: https://package.openupm.com
Scopes: com.cysharp, com.vrmc, com.github-glitchenzo
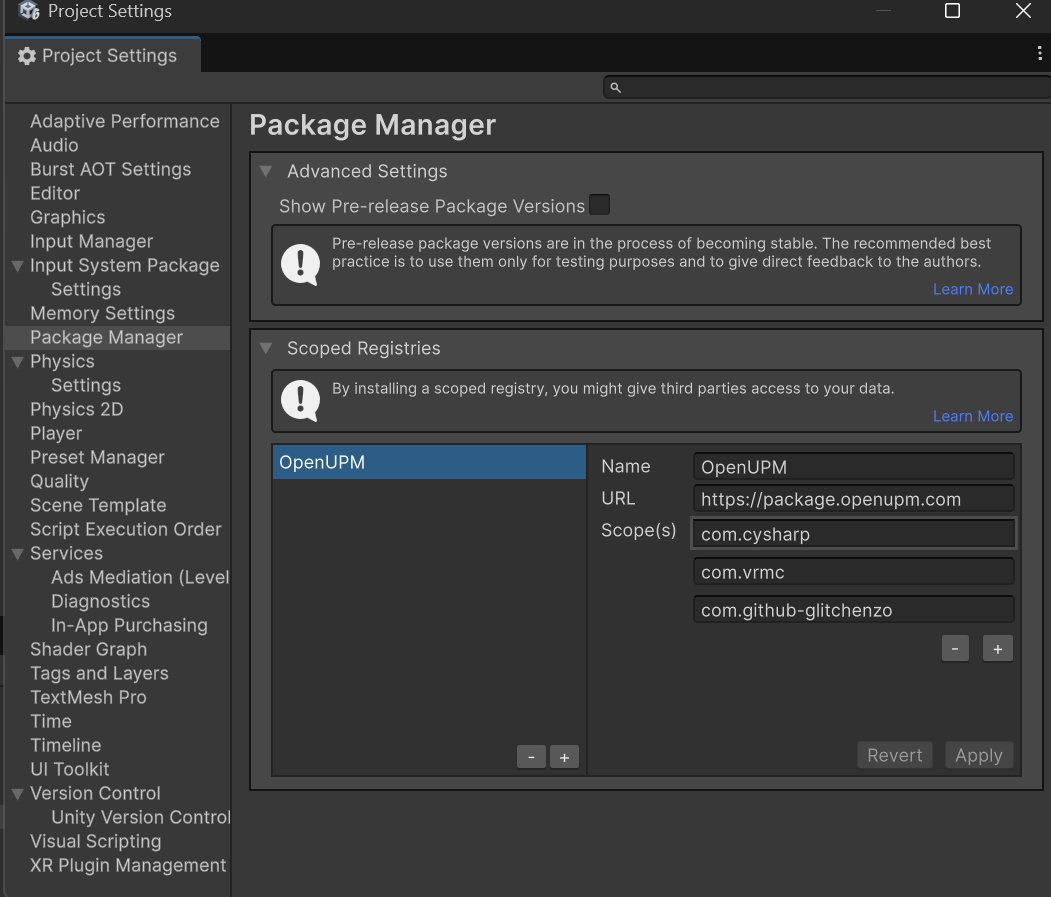 ▲Figure 1-1: Scoped Registries settings in Project Settings > Package Manager
Step 2: Installing NuGetForUnity and NuGet Version of R3
Install the core R3 library required by ShapeSync via NuGet.
- In the Unity menu, open Window > Package Manager.
- Click the “+” button in the upper left corner and select Add package by name….
- Enter the following in the Name field and click Add:
com.github-glitchenzo.nugetforunityIf a version specification is needed, enter
4.5.0. - Once installation is complete, a NuGet menu will be added to the top menu of Unity. Open NuGet > Manage NuGet Packages.
- Type
R3in the search box, locateR3(version1.3.1) from the list, and click Install.
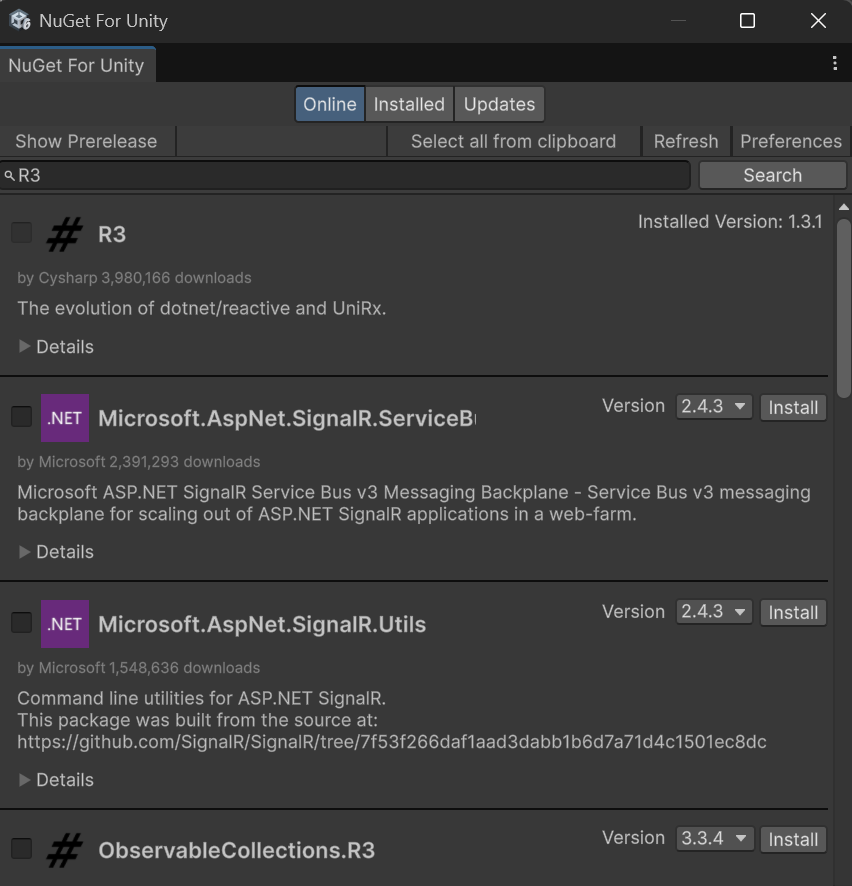 ▲Figure 1-2: Installing R3 (1.3.1) in NuGet > Manage NuGet Packages
[!IMPORTANT] Important Checkpoints
- The
R3 1.3.1displayed in Unity Package Manager (described in Step 3 below) and the NuGet version ofR3are different packages. Make sure to install from the NuGet window.- After installation, verify that
<package id="R3" version="1.3.1" manuallyInstalled="true" />is written inAssets/packages.configof your project, and thatAssets/Packages/R3.1.3.1/lib/.../R3.dllhas been generated.
[!WARNING] Keep the Step 2-to-Step 3 order. If you proceed to Step 3 before confirming that the NuGet version of R3 has been restored, compiler errors may stop Unity’s domain reload. While domain reload is stopped, the
[InitializeOnLoad]recovery hook does not run, so automatic recovery cannot be expected. Complete the Step 2 checks before moving to Step 3; if a problem occurs, see Q1.
Step 3: Installing the R3 Unity Adapter
Install the Unity adapter package to ensure seamless integration of R3 within Unity.
- Open Window > Package Manager.
- Click the “+” button in the upper left corner and select Add package by name….
- Enter the following and click Add:
com.cysharp.r3Specify version
1.3.1.
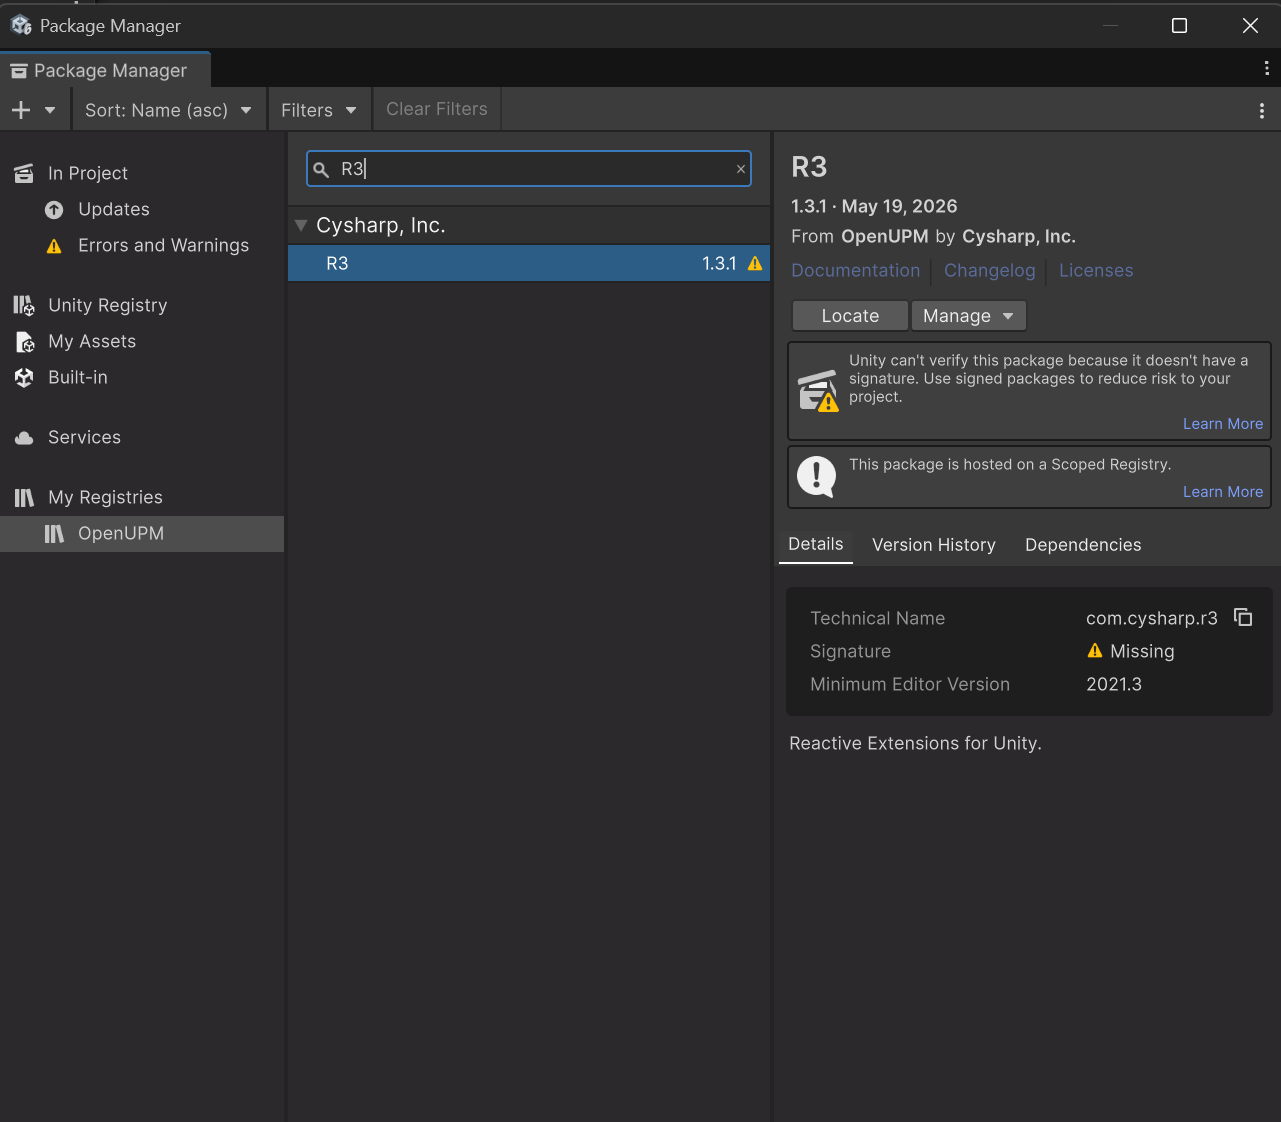 ▲Figure 1-3: Confirming and adding the com.cysharp.r3 package in Package Manager
Step 4: Confirming/Installing URP and Configuring the Graphics API
- Confirming URP:
- If you used the Universal 3D template, URP 17.x is automatically installed. Check both Project Settings > Graphics and Project Settings > Quality to confirm that the URP Asset / Renderer referenced by the active quality settings is valid. The placement and assignment vary by Unity version and template, so do not assume a particular serialized assignment.
- If you used a different template, install
com.unity.render-pipelines.universal(17.0.0 or higher, 24.3 verification standard 17.3.0) from the Package Manager, and assign the URP Asset in the applicable Graphics / Quality setting used by the project.
- Graphics API Configuration on Windows:
- Open Edit > Project Settings > Player.
- Under the Other Settings > Rendering section, uncheck Auto Graphics API for Windows.
- Place Direct3D12 at the top of the list (or select Vulkan).
- After changing this setting, make sure to restart the Unity Editor.
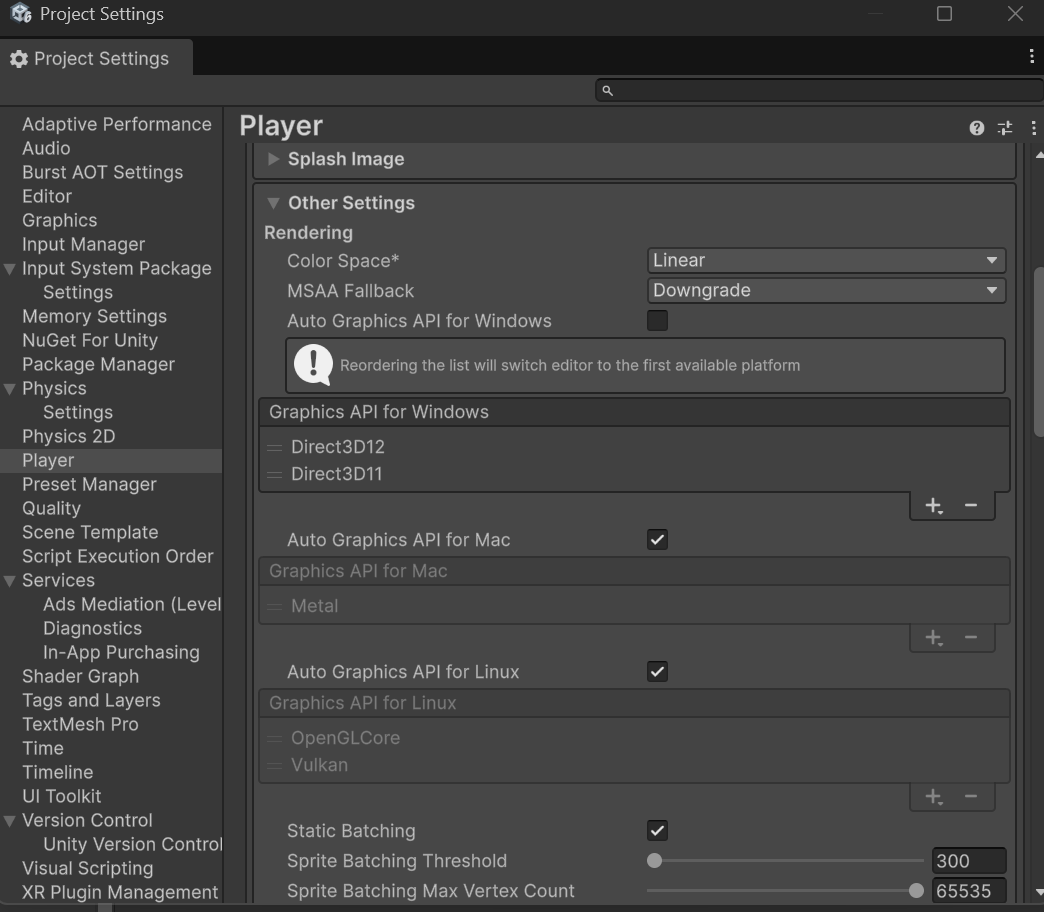 ▲Figure 1-4: Graphics APIs settings in Project Settings > Player (Direct3D12 set to the top)
Step 5: Installing the ShapeSync Core Package
Install the main ShapeSync package by specifying the Git URL.
- Open Window > Package Manager.
- Click the “+” button in the upper left corner and select Add package from git URL….
- Copy and paste the following URL exactly as it is and click Add:
https://github.com/zgock999/ShapeSync.git?path=Packages/net.zgock-lab.shapesync#0.2.2
[!WARNING] In the URL,
?path=Packages/net.zgock-lab.shapesyncmust be placed before#0.2.2. If the order is different, a Git fetch error (pathspec error) will occur.
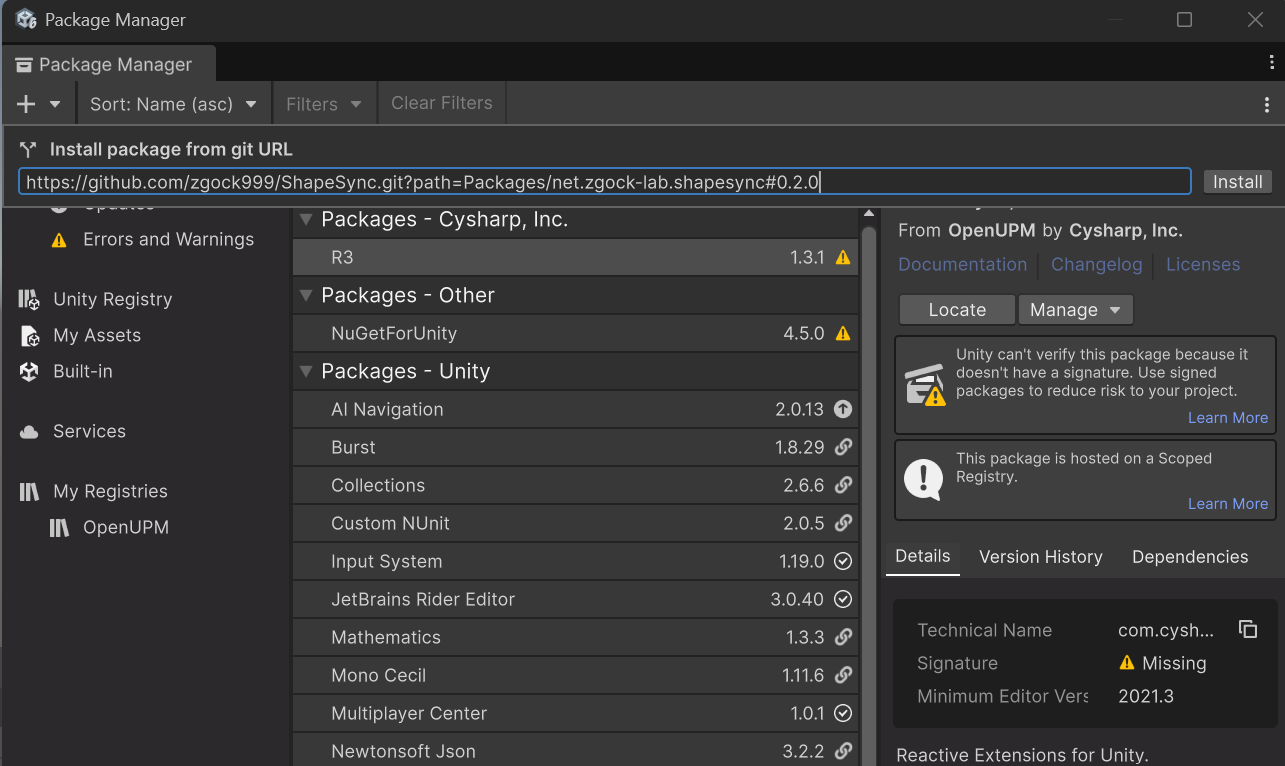 ▲Figure 1-5: Adding ShapeSync Core from Git URL in Package Manager
Step 6: Checking and Modifying Project Settings
Adjust project settings to properly handle ShapeSync’s large-capacity data and materials.
- Changing Asset Serialization Mode:
- Open Edit > Project Settings > Editor.
- Change Mode under Asset Serialization to Mixed (*make sure to change it from the default “Force Text” in a new project).
- Checking Color Space:
- Open Edit > Project Settings > Player > Other Settings > Rendering.
- Verify that Color Space is set to Linear (if it is set to Gamma, change it to Linear).
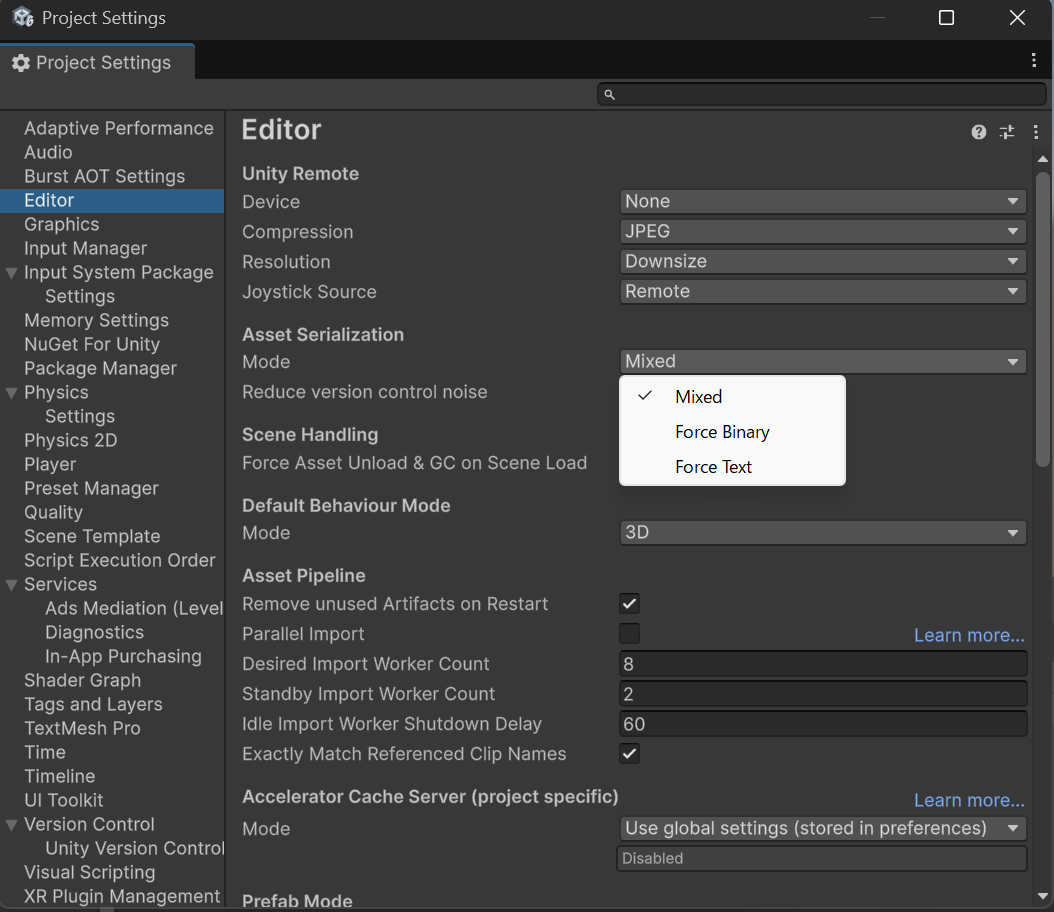 ▲Figure 1-6: Asset Serialization Mode settings in Project Settings > Editor (Selecting Mixed)
Step 7: [Optional] Installing UniVRM (Only When Using VRM Integration)
If you use ShapeSync with VRM 1.0 format avatar models, add the following packages (*skip this step if using ShapeSync Core alone):
- From Add package by name… in Window > Package Manager, add the following two packages in order:
com.vrmc.gltf(Version:0.131.1)com.vrmc.vrm(Version:0.131.1)
Step 8: [Optional] Installing ShapeSync VRM Integration Companion
Add the extension package for VRM integration and enable the integration flag.
- From Add package from git URL… in Window > Package Manager, add the following:
https://github.com/zgock999/ShapeSync.git?path=Packages/net.zgock-lab.shapesync.vrm#0.2.2 - Open Edit > Project Settings > Player > Other Settings.
- Add
SHAPESYNC_USE_UNIVRMto Scripting Define Symbols and click Apply.
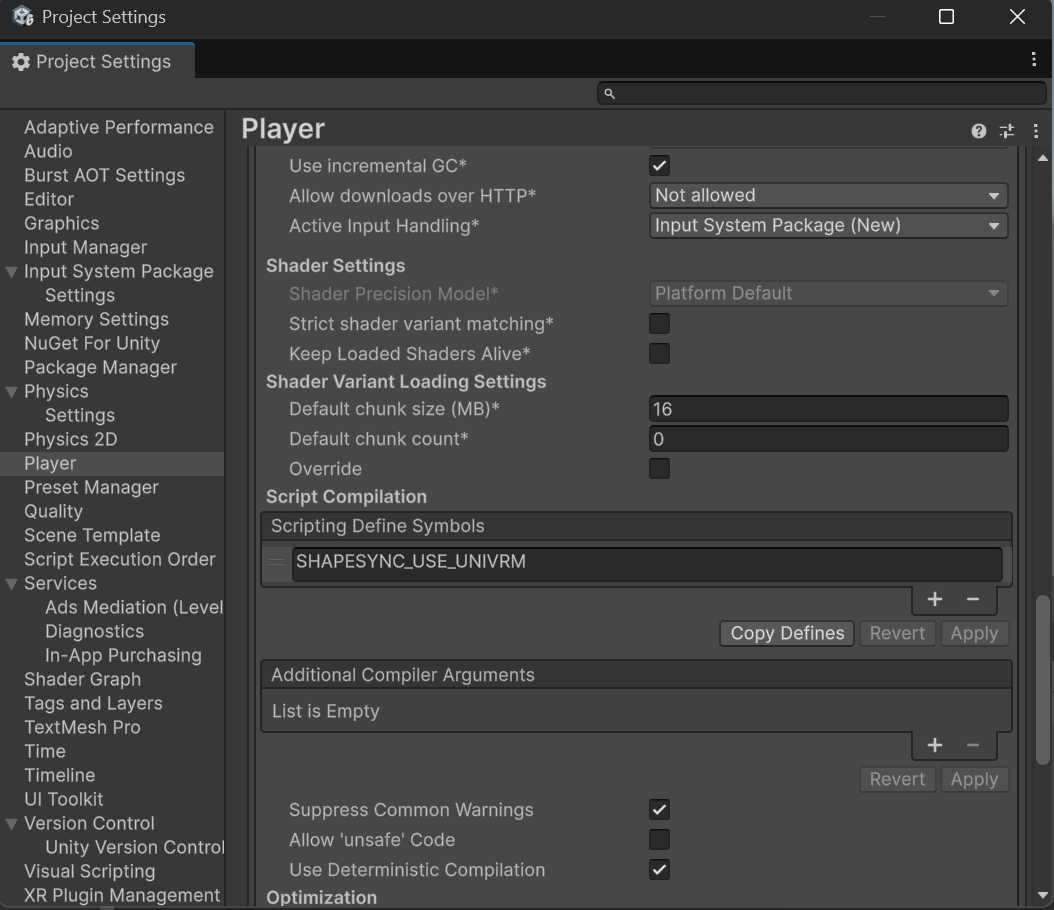 ▲Figure 1-7: Scripting Define Symbols settings in Project Settings > Player (Adding SHAPESYNC_USE_UNIVRM)
5. [Important Note] DirectX 12 Configuration When Using Unity 6000.0 (Unity 6.0 LTS)
There are important notes regarding Graphics API configuration when using Unity 6.0 LTS (6000.0.x) on Windows.
1. Why is DirectX 12 (or Vulkan) Required?
ShapeSync’s texture transformation engine (Texture StackMachine) generates and composites textures in real time using the GPU’s high-speed Async Compute Queue and GraphicsFence.
Because legacy DirectX 11 (D3D11) does not support these features, running texture processing under D3D11 causes a runtime error (NotSupportedException). D3D11 is unsupported.
2. Conditions and Version Differences
- When using Unity 6.0 LTS (
6000.0.x) [Manual change required]:- Unity 6.0 defaults to D3D11 as the Graphics API on Windows. Therefore, you must manually change it to Direct3D12 (or Vulkan).
- When using Unity 6.3 LTS (
6000.3.x) [Verification only]:- In the Unity 6.3 verification environment, Direct3D12 is selected by default. Open the settings screen and confirm that Direct3D12 is at the top.
3. Configuration Steps
- Open Edit > Project Settings > Player > Other Settings > Rendering.
- Uncheck Auto Graphics API for Windows.
- Place Direct3D12 at the top of the list (or select Vulkan).
- Restart the Unity Editor (*The new Graphics API will not take effect until restarted).
4. Reference and Rationale
This note is based on the following descriptions in the public documentation README.md:
## Requirements: Async compute requirements for D3D12 / Vulkan, behavior differences between Unity 6.0 (D3D11 default) and Unity 6.3 (D3D12 default), and explicit note on D3D11 non-support.### Choose the project template: Note requiring manual change from D3D11 to D3D12 in Unity 6.0.### 4. Confirm or install URP: Graphics APIs configuration steps on Windows and the necessity of restarting the Editor.### Troubleshooting > Texture processing fails on Windows:NotSupportedExceptionoccurrence in D3D11 and steps to change to D3D12.
6. Common Issues and Solutions (Troubleshooting)
Q1. Compiler errors related to R3 occur
- Symptom: Errors such as
The type or namespace name 'Collections' does not exist in the namespace 'R3', or missingFrameProvider,Observable<>, etc. - Cause: The NuGet version of R3 in Step 2 is not properly installed (only the Package Manager Unity adapter is installed). Proceeding to Step 3 before the Step 2 restore can leave compiler errors that stop domain reload, preventing the
[InitializeOnLoad]recovery hook from running and automatic recovery from occurring. - Solution: Open NuGet > Manage NuGet Packages and install the NuGet version of
R3(1.3.1). Verify that R3 is listed inAssets/packages.config, resolve the compiler errors, and restart Unity if needed.
Q2. Error occurs during texture processing
- Symptom: An error
NotSupportedException: Cannot determine if this AsyncQueueSynchronisation Graphics...occurs. - Cause: The Graphics API remains set to DirectX 11 (D3D11).
- Solution: Refer to Section 5 Important Note, change the Graphics API to Direct3D12 or Vulkan, and restart Unity.
Q3. Error indicating Core cannot be found occurs in VRM Companion
- Symptom: An error occurs when adding the VRM Companion package.
- Cause: VRM Companion was imported before ShapeSync Core.
- Solution: Remove VRM Companion, install ShapeSync Core from Step 5 first, and then add VRM Companion again.
Q4. Error occurs with Git URL specification
- Symptom: An error
Cannot checkout repository ... pathspec ... did not match any file(s) known to gitoccurs. - Cause: The Git URL format is incorrect.
- Solution: Verify that
?path=Packages/net.zgock-lab.shapesyncis placed before#0.2.2.
7. Verifying Installation (Running Package Tests)
After completing the installation, you can verify that it was installed correctly by running tests.
- Open
Packages/manifest.jsonof your project in a text editor and add"net.zgock-lab.shapesync"to the"testables"field."testables": [ "net.zgock-lab.shapesync" ] - Return to the Unity Editor and open Window > General > Test Runner from the menu.
- Run EditMode and PlayMode tests and confirm that all tests pass successfully (approx. 1,175 EditMode tests and 136 PlayMode tests in a Core-only configuration).