ShapeSync
Chapter 8: Advanced Outfit Registration and Figure Mask (Hiding Base Mesh and Correcting Poke)
← Back to Tutorial Index | ← Chapter 7: Advanced Outfit Registration and Collection (Shoe Deformation and Alignment)
This chapter explains the procedure for eliminating the protrusion (Poke) of the base body remaining at the toes and soles of shoes (Shoes1) identified at the end of Chapter 7, using the dedicated outfit masking feature Figure Mask.
- First Half (VRoid Studio): Using 3D Paint, create a mask image (
Shoes1Mask.png) painted black only in the areas corresponding to the toes and soles hidden inside the shoes, and save it toAssets/Texture/Shoes1Mask.pngin the Unity project. - Second Half (Unity / ShapeSync): In ShapeSync Editor under
Shoes1 > Figure Mask, register and save the mask texture for theBodymaterial, and verify in Play Mode after re-Generate that Poke has been completely resolved (Before / After).
1. Introduction (Chapter 7 Poke Issue and Mechanism of Figure Mask)
In Chapter 7, the Collection feature was used to fit the shoe position and ankle angles cleanly, but during walking animation playback, a slight protrusion of the base body skin was observed at the tip of the shoe toes (Poke).
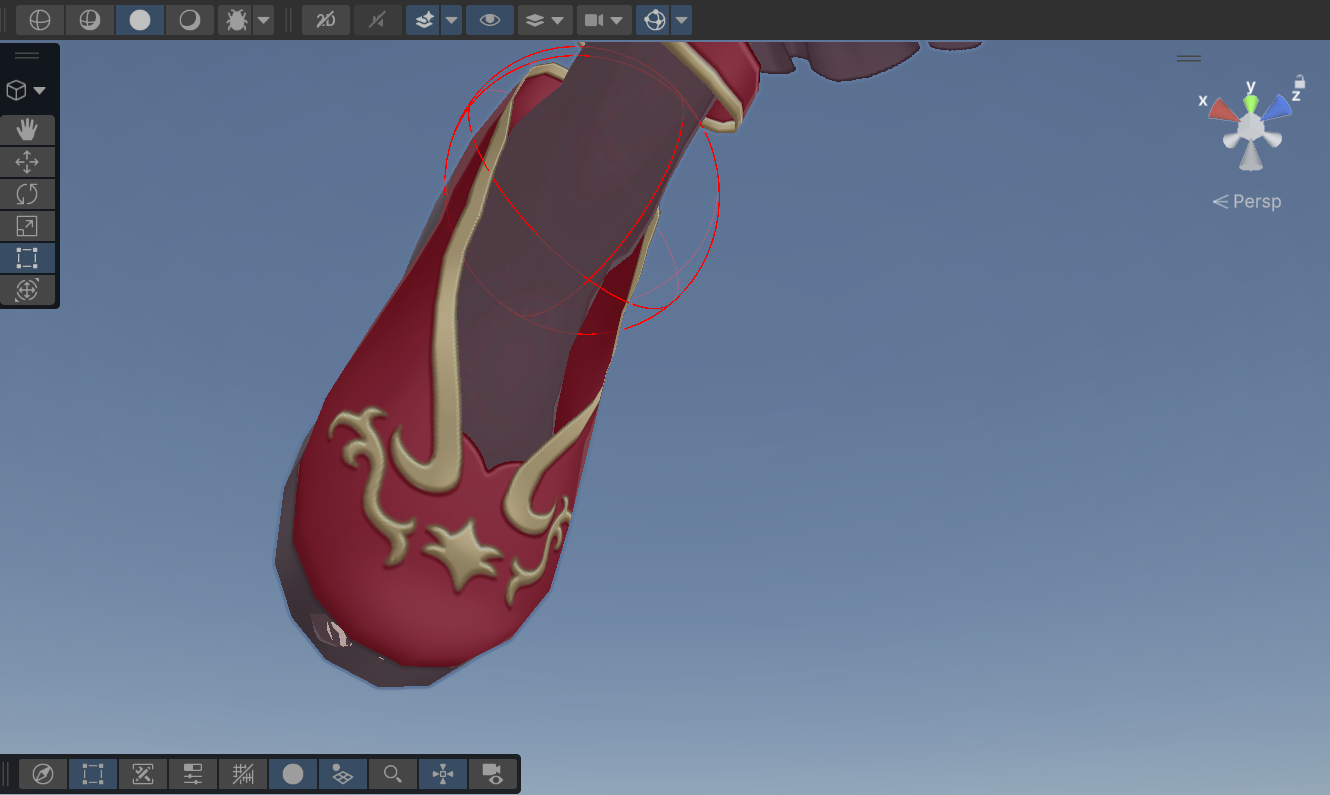 ▲Figure 8-1: Base body poking through the tip of the shoe toes identified at the end of Chapter 7 (Before)
Figure Mask Mechanism and Polarity Rules
- What is Figure Mask: A feature that uses texture masks to erase (make transparent) base body skin mesh that should be completely hidden inside clothes or shoes when wearing an outfit, fundamentally preventing protrusion.
- Mask Polarity (Black and White Rules):
- Black (#000000): Parts to be hidden (erased) from the Figure’s
Body - White (#FFFFFF): Parts to continue being displayed on the Figure’s
Body
- Black (#000000): Parts to be hidden (erased) from the Figure’s
- Visual Criteria for Black Painted Area:
- Paint black only the area corresponding to the toes and soles protruding from the shoes.
- Take care not to paint black other body parts exposed outside the shoes, such as ankles and legs.
2. Creating and Saving Mask with 3D Paint in VRoid Studio
Create the mask image in the texture editing screen of VRoid Studio.
2.1 Opening the Texture Editing Screen
- Launch VRoid Studio and open the base body model
BasicFemale.vroid. - Select the
Bodytab in the top menu, and click theEdit Texturebutton on the right panel.
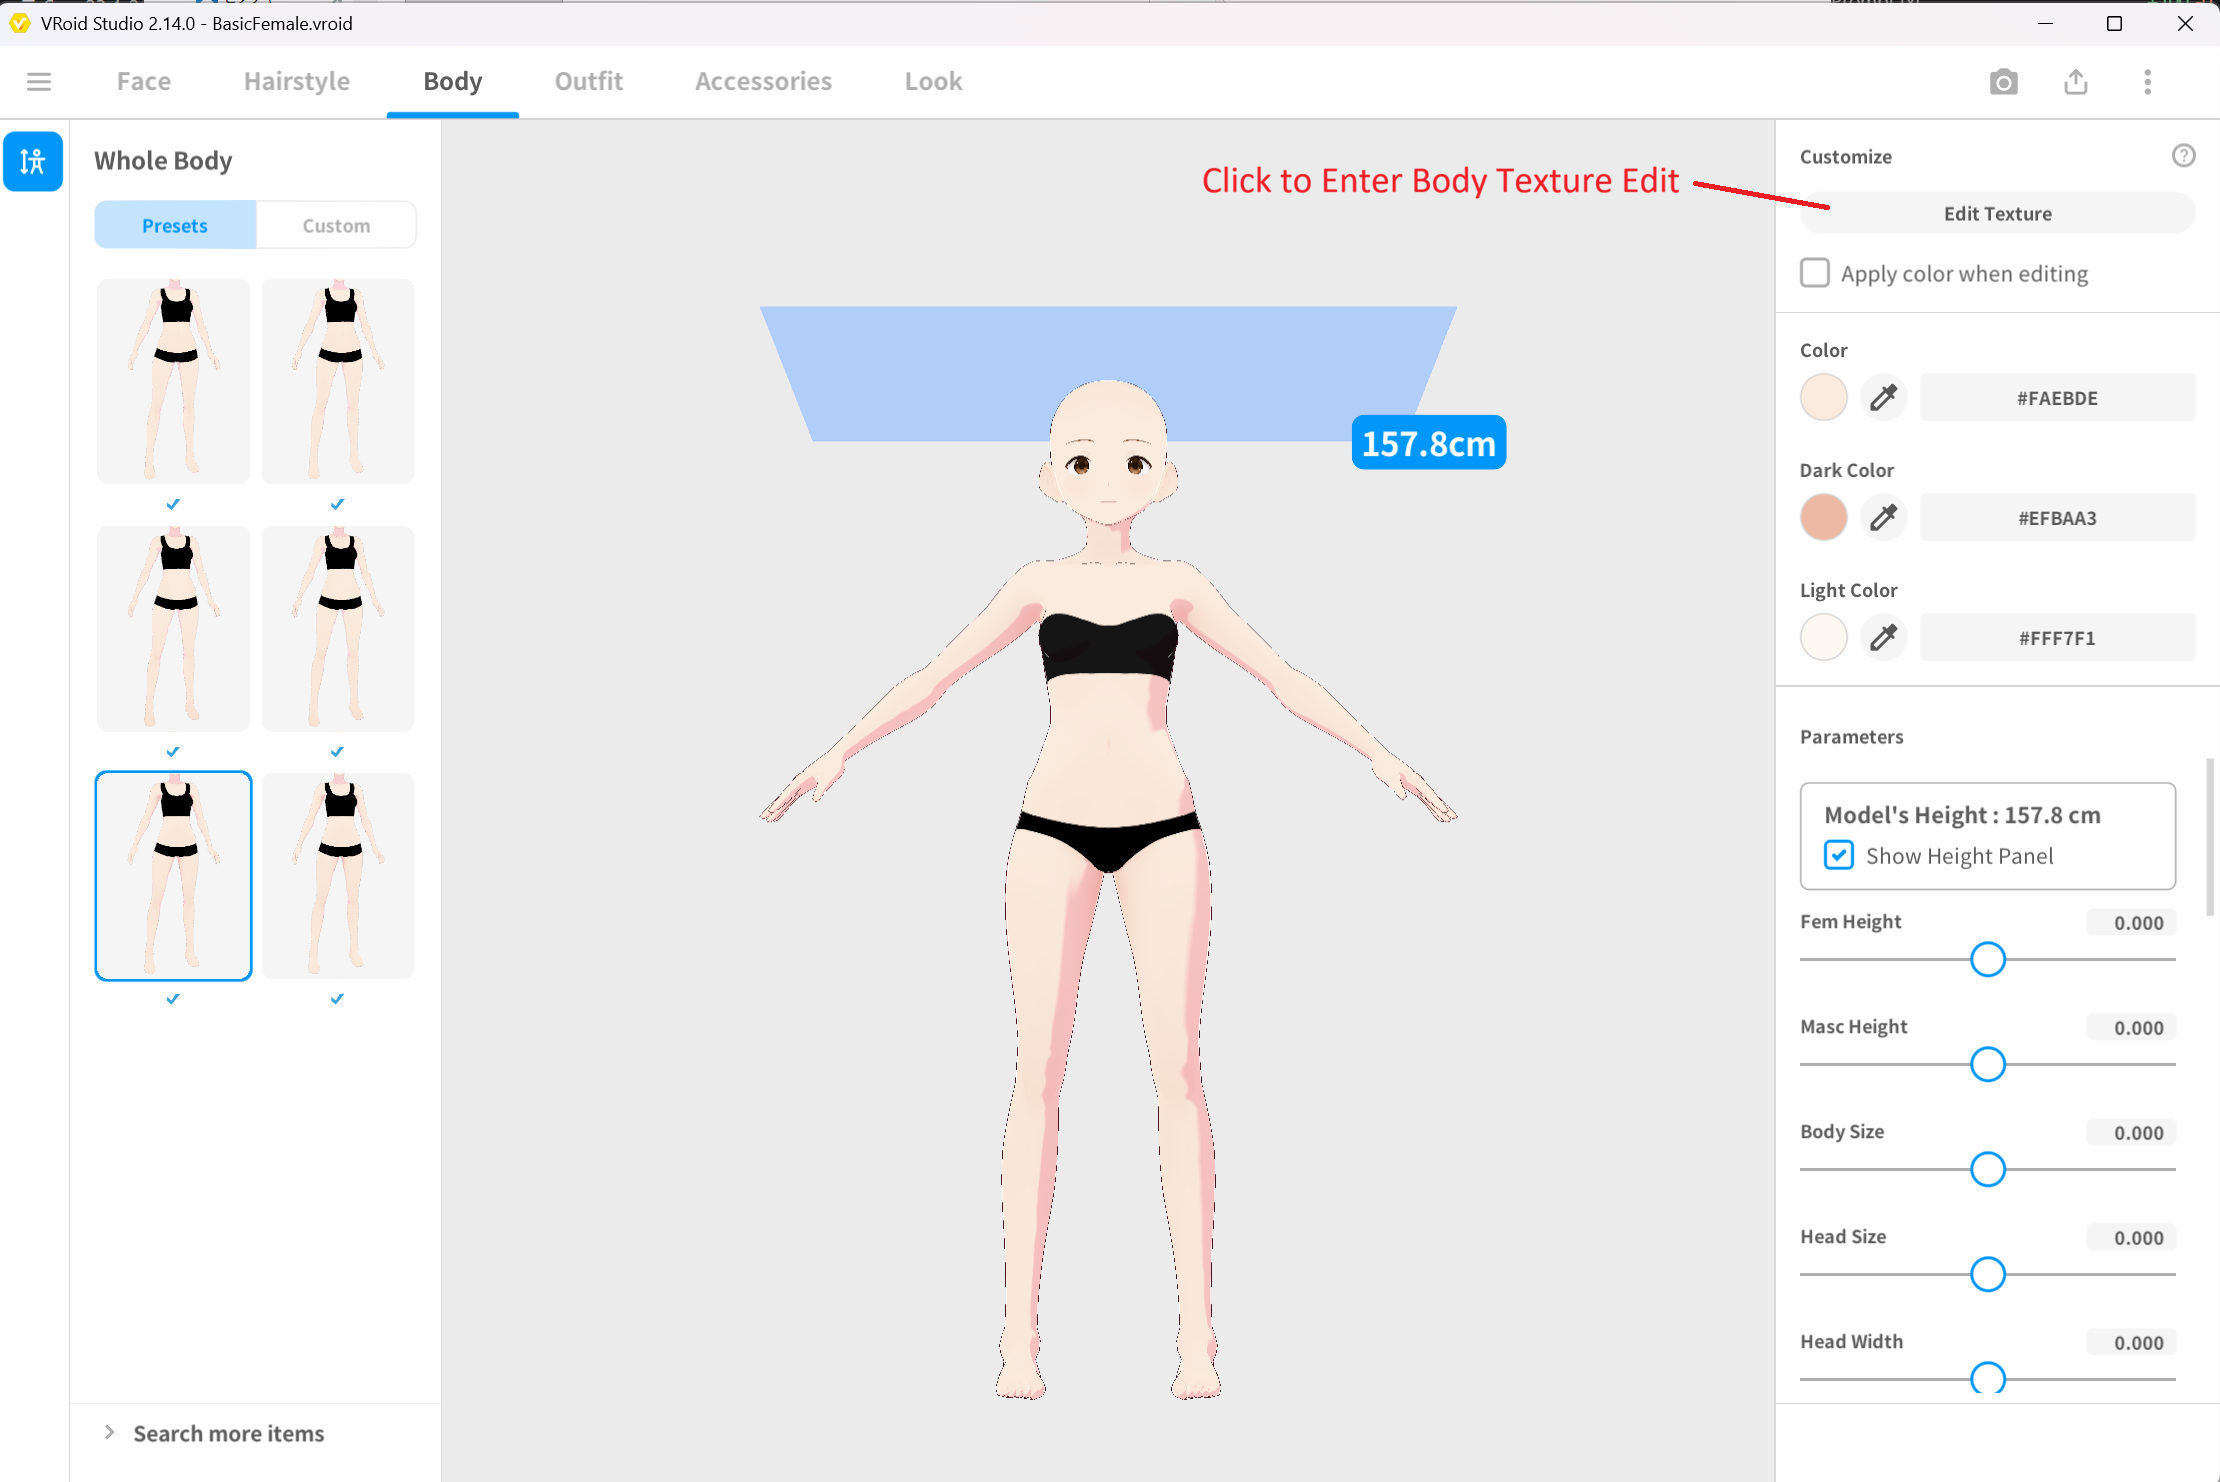 ▲Figure 8-2: Clicking Body tab > Edit Texture to enter texture editing
2.2 Creating Mask Layer and Painting
- Select
Skinfrom the categories on the left. - In the layer panel, create a New Layer (
+button). - Select the Bucket Tool (Fill) from the toolbar, set the color to White (#FFFFFF), and fill the entire layer with white.
- Select the Brush Tool from the toolbar, set the brush color to Black (#000000), opacity to
100, and brush size to a suitable thickness (e.g.37). - In the 3D View on the right, paint black while visually checking only the toes and soles hidden inside the shoes.
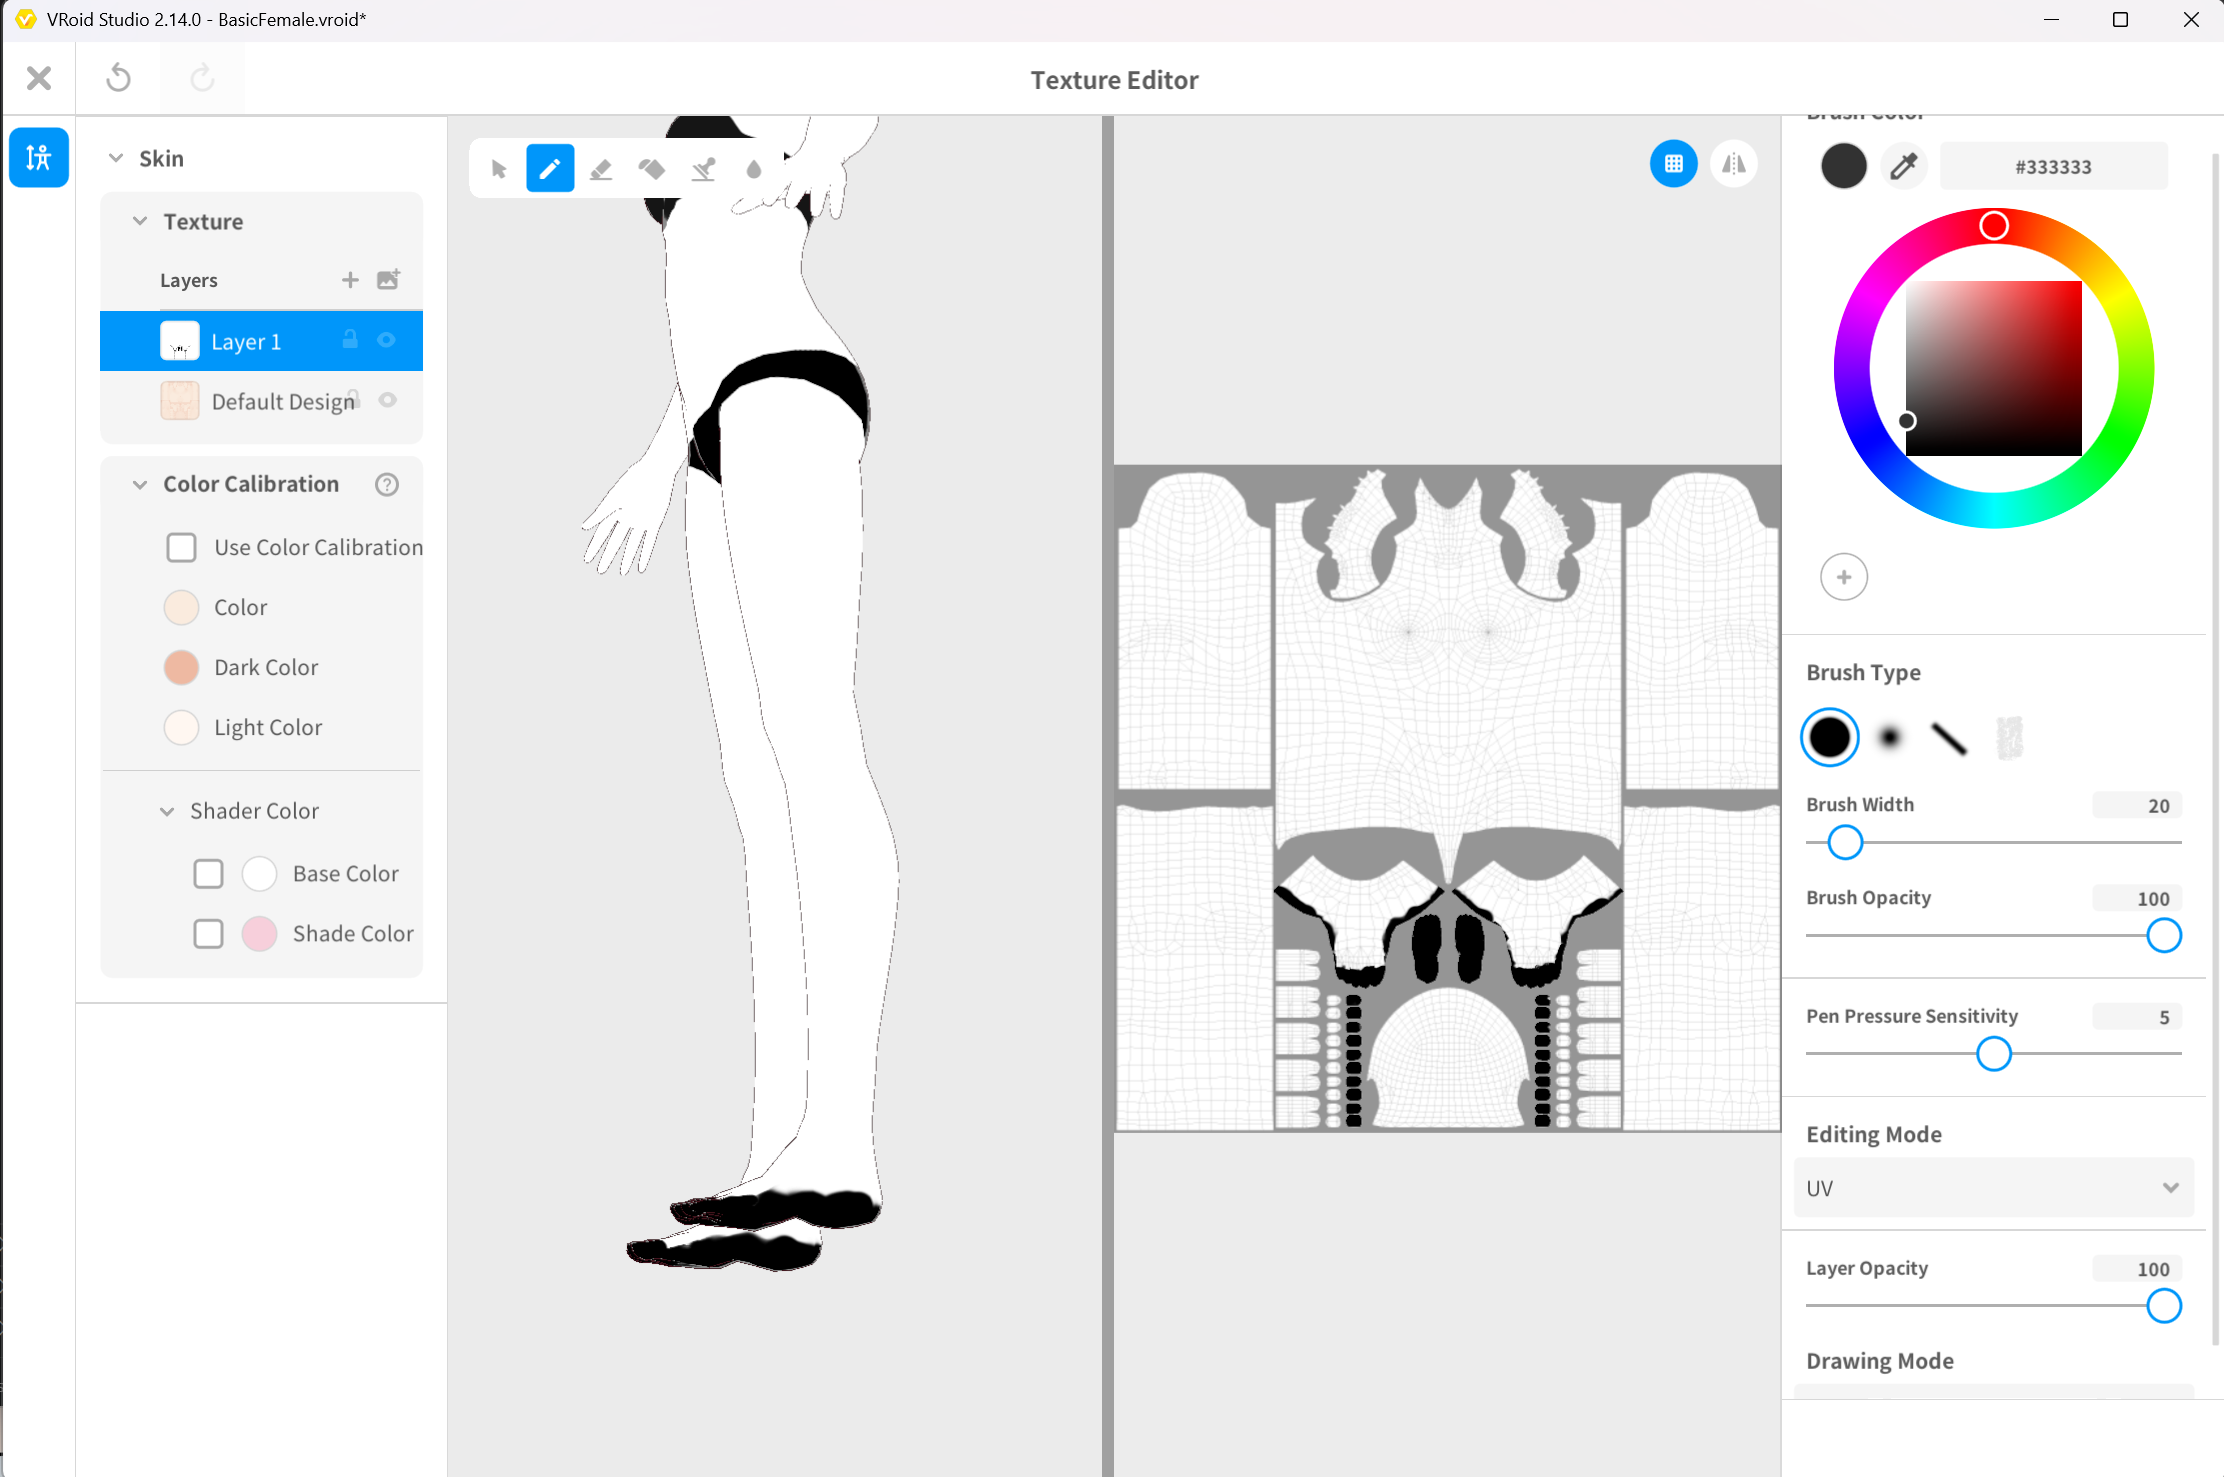 ▲Figure 8-3: On the white-filled layer, painting toes and soles hidden inside shoes black (#000000) from 3D View side
2.3 Exporting the Mask Image
- Right-click the painted mask layer and select
Exportfrom the context menu. - In the save dialog, specify
Assets/Texture/Shoes1Mask.pnginside the Unity project and save as PNG format.
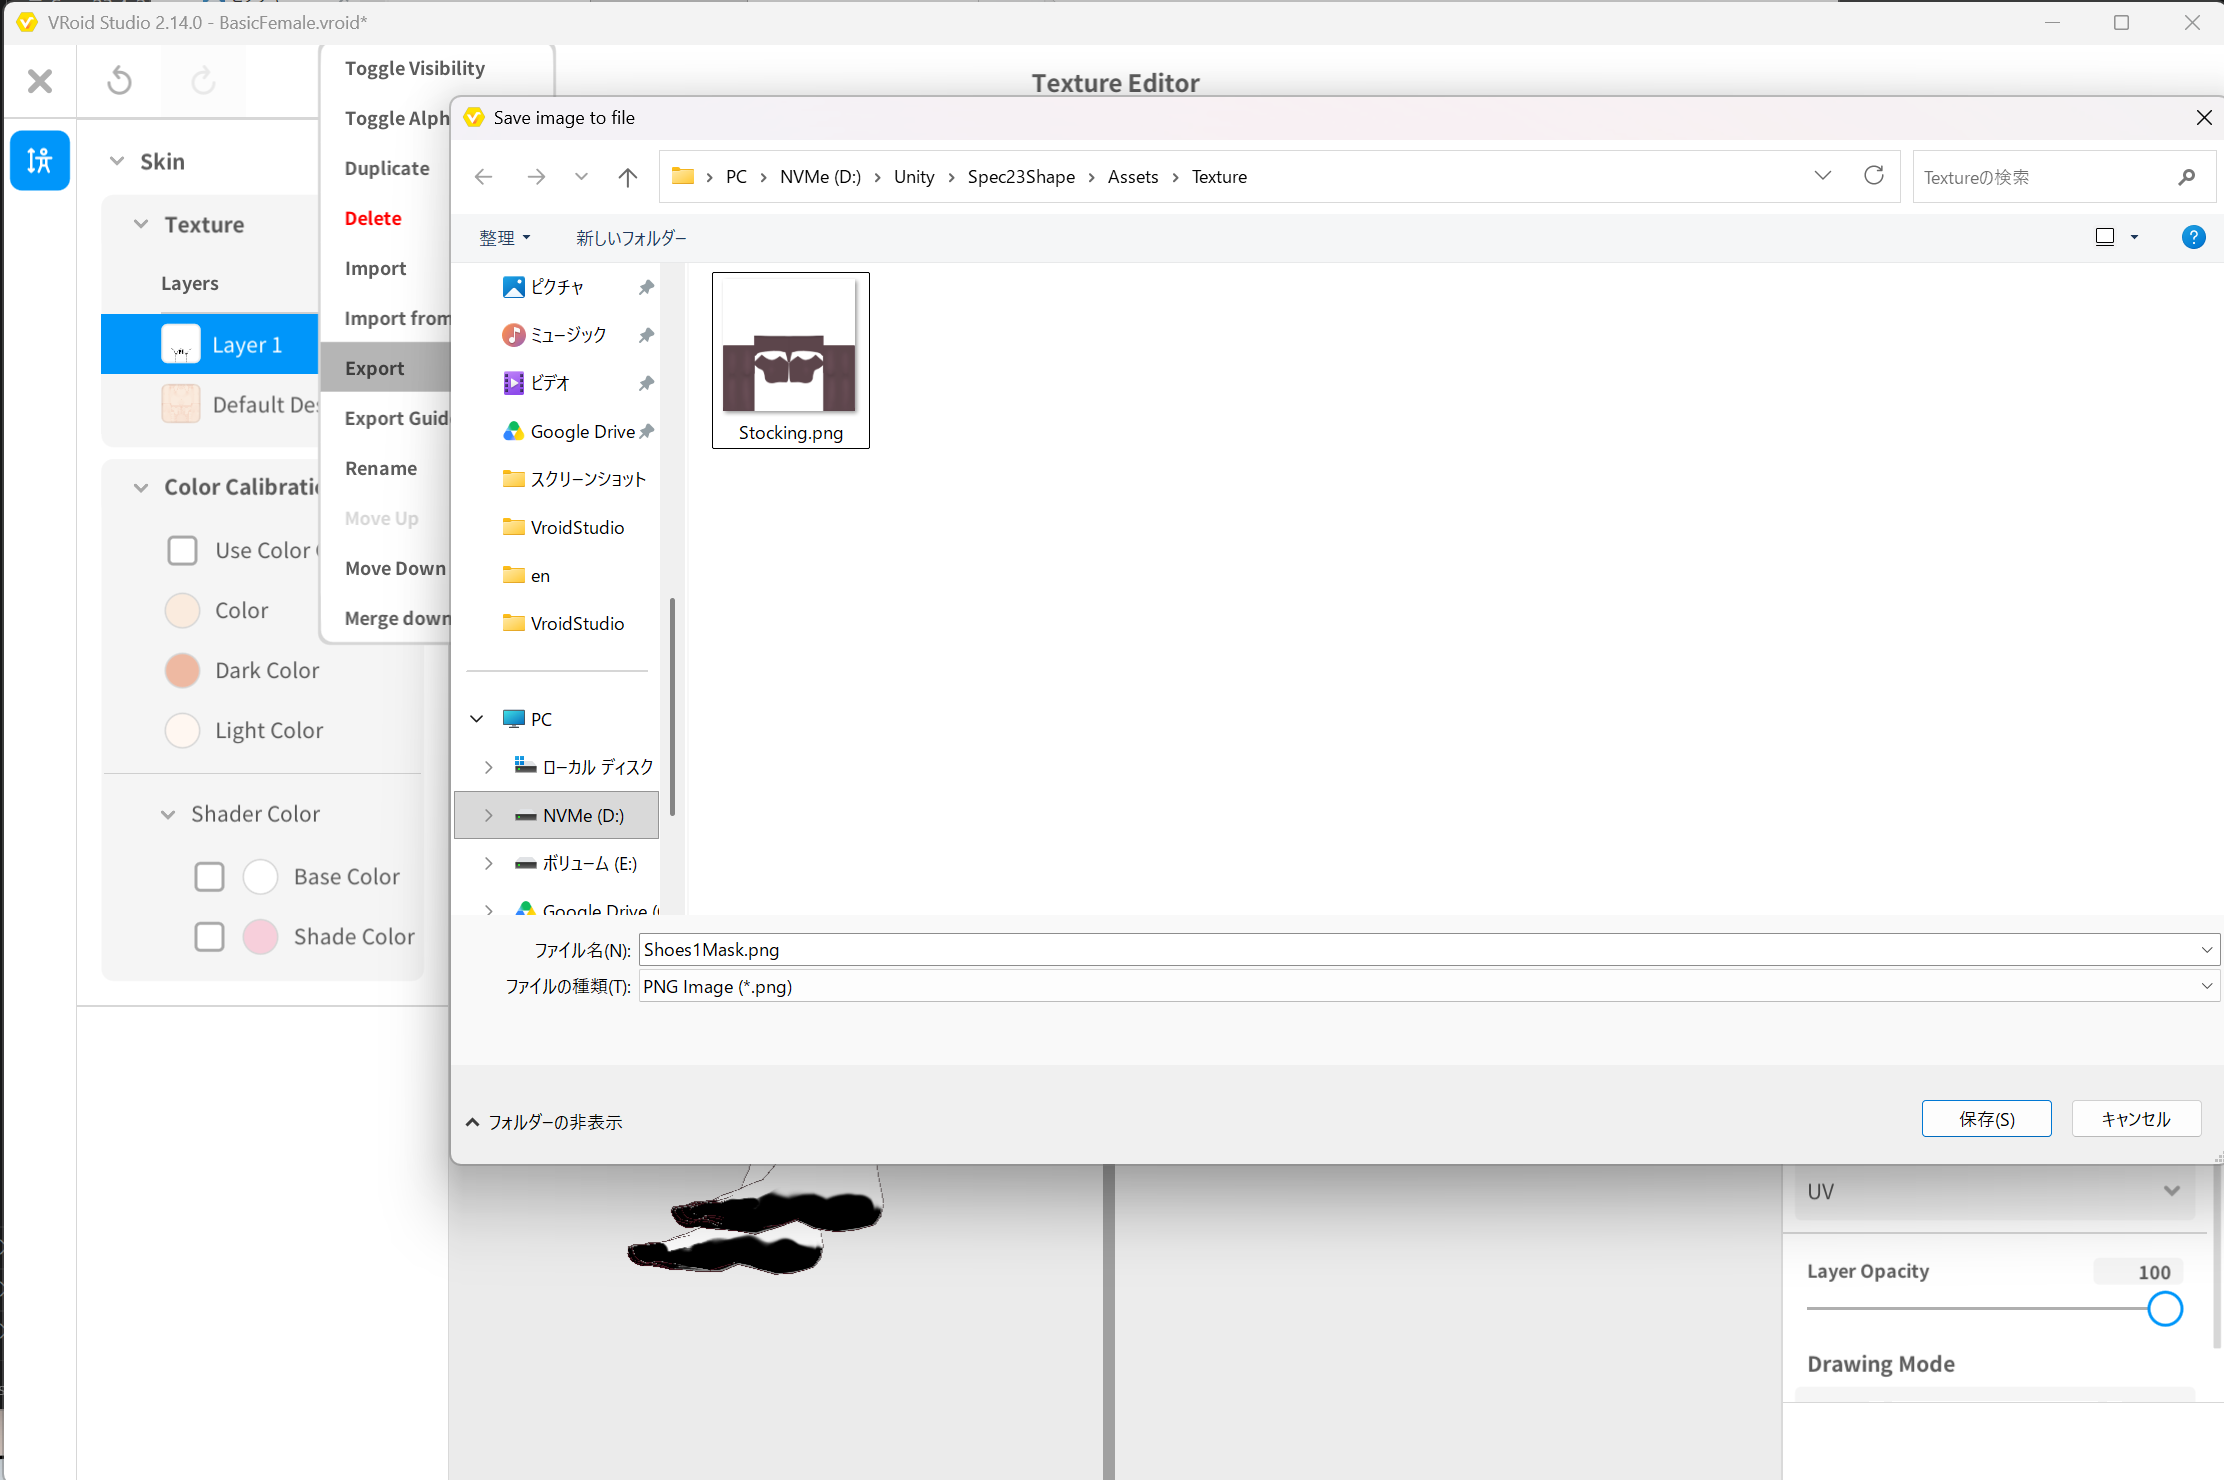 ▲Figure 8-4: Right-clicking created layer, selecting Export, and saving as Assets/Texture/Shoes1Mask.png
2.4 Verifying Texture in Unity
- Return to the Unity Editor and select
Assets > Texture > Shoes1Maskin the Project window. - In the Inspector Preview, verify that the texture image has only the toes and soles painted black on a white background (Import Settings can remain
Texture Type: DefaultandAlpha Is Transparency: OFF).
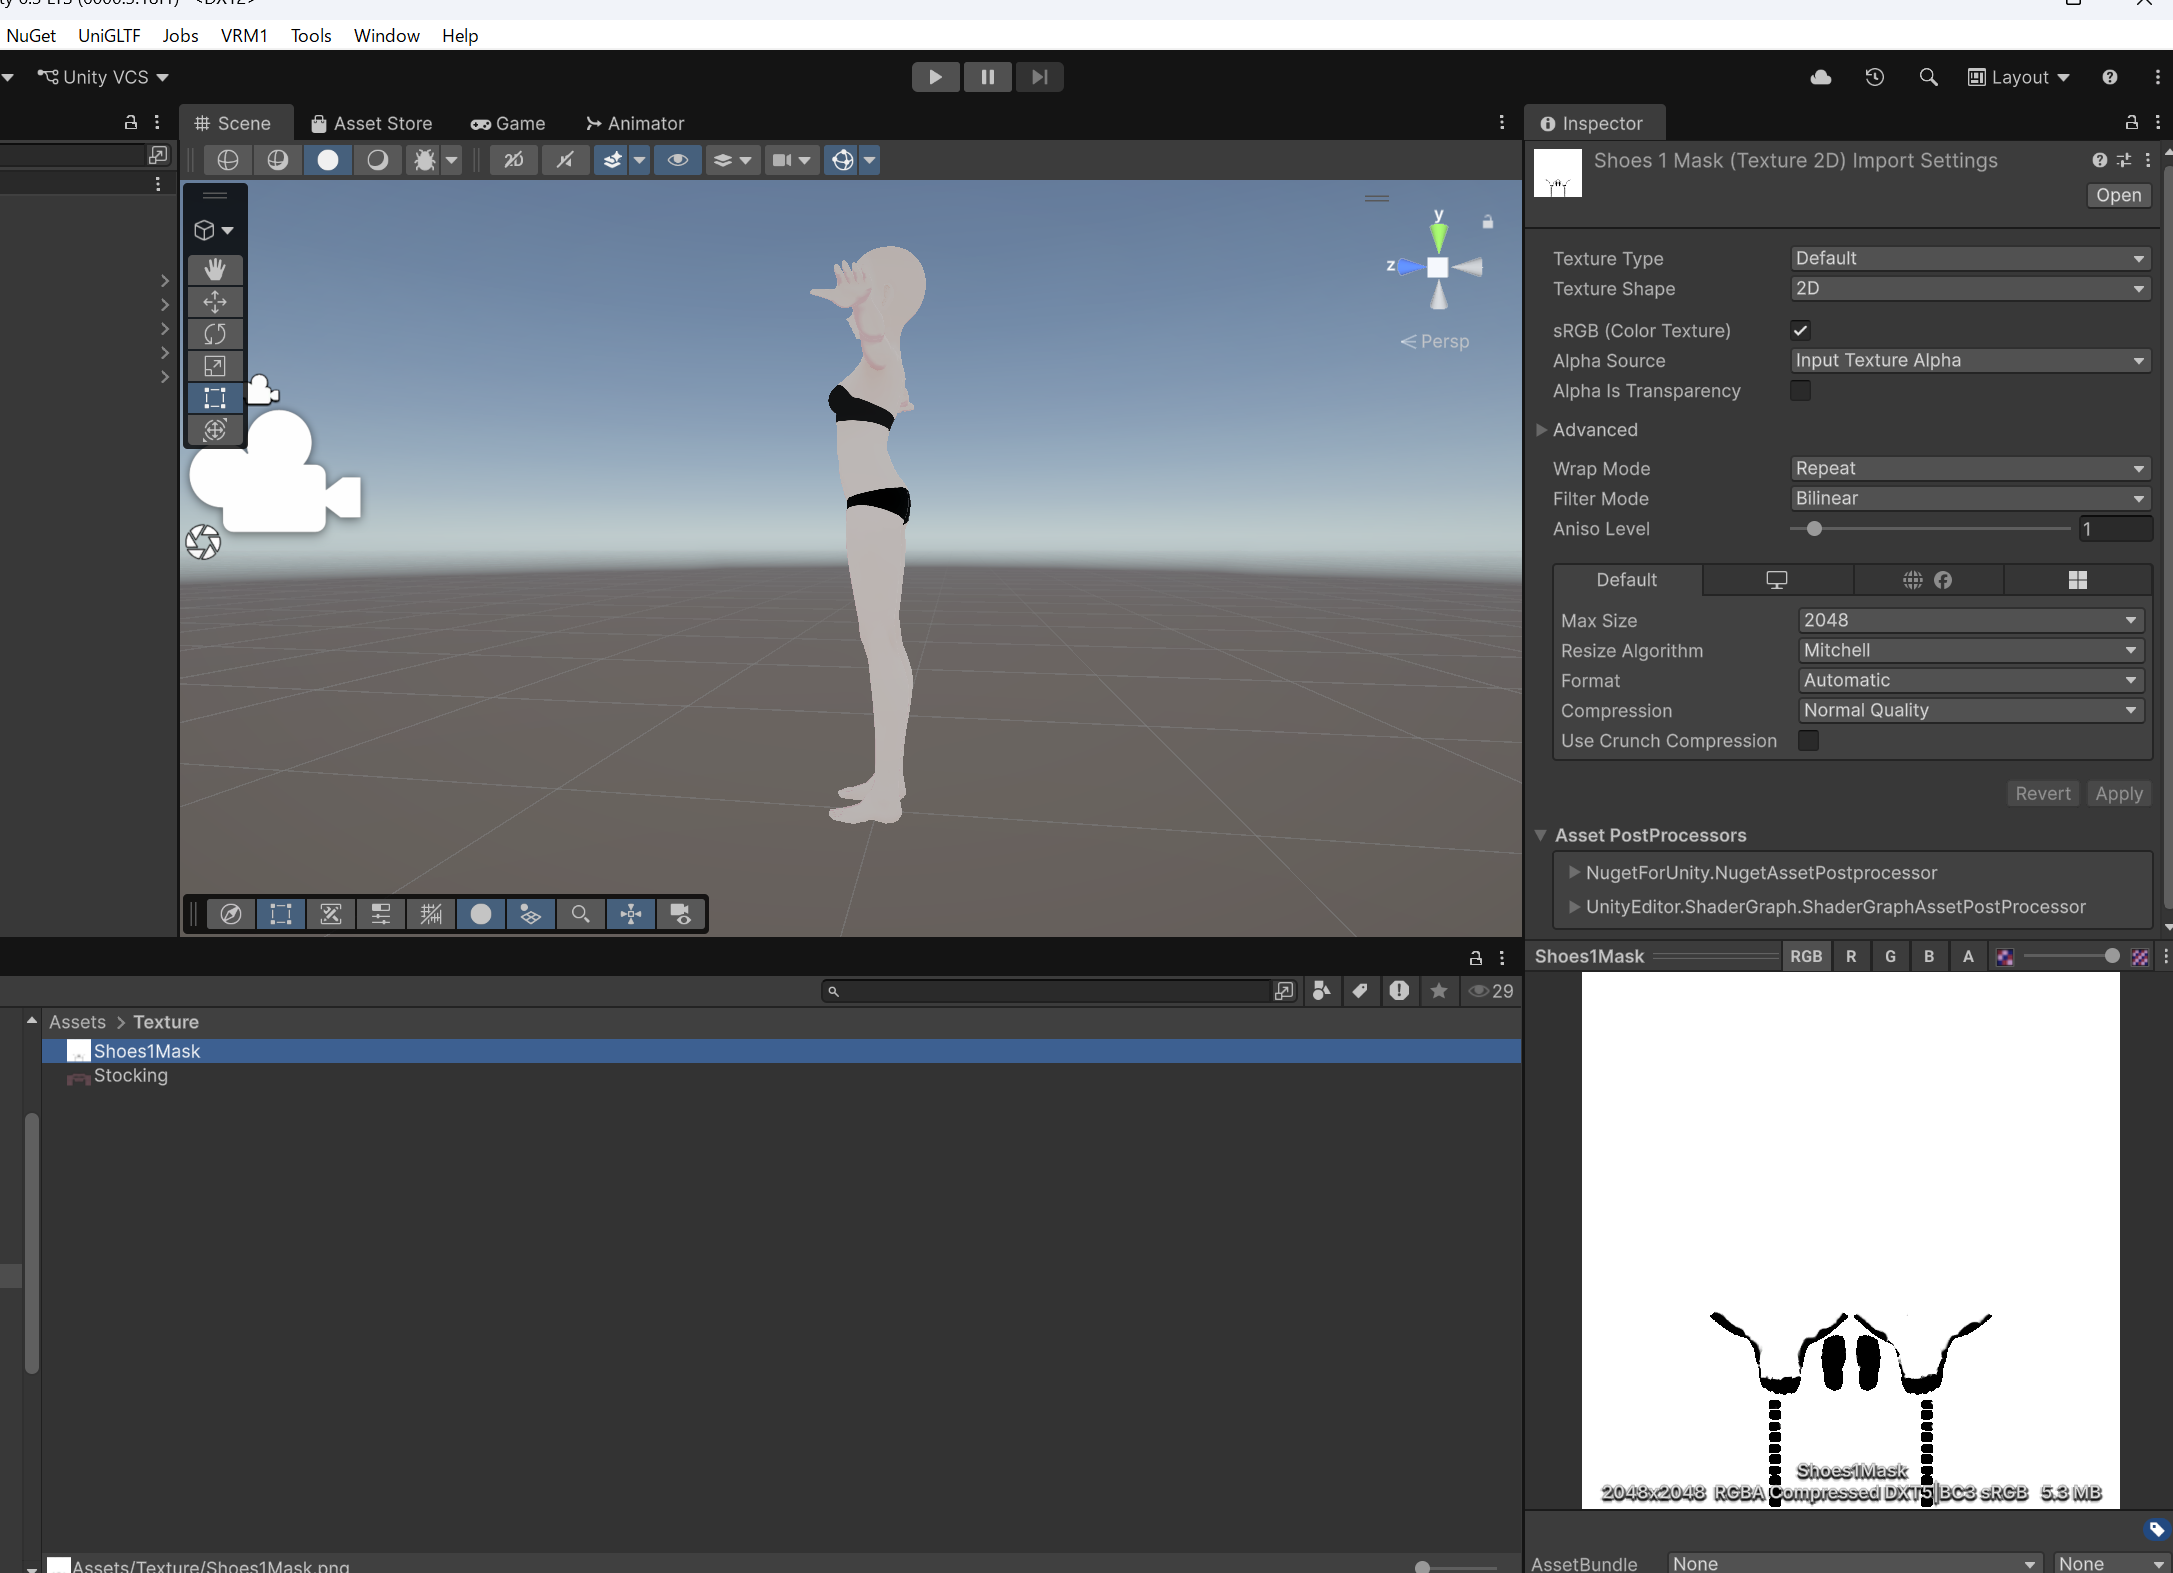 ▲Figure 8-5: Selecting Shoes1Mask texture in Unity Project window and confirming toes and soles painted black on white background
3. Registering Figure Mask in ShapeSync Editor
Register the created mask image into ShapeSync Editor.
- From the top menu in Unity Editor, open Tools > zgock > ShapeSync > ShapeSync Editor.
- Select
Outfits > Mesh Outfits > Shoes1 > Figure Maskfrom the left TreeView. - In the
Figure Material Entrydropdown, selectBody. - In
Mask Texture, drag and dropShoes1Mask.png(Assets/Texture/) from the Project window.
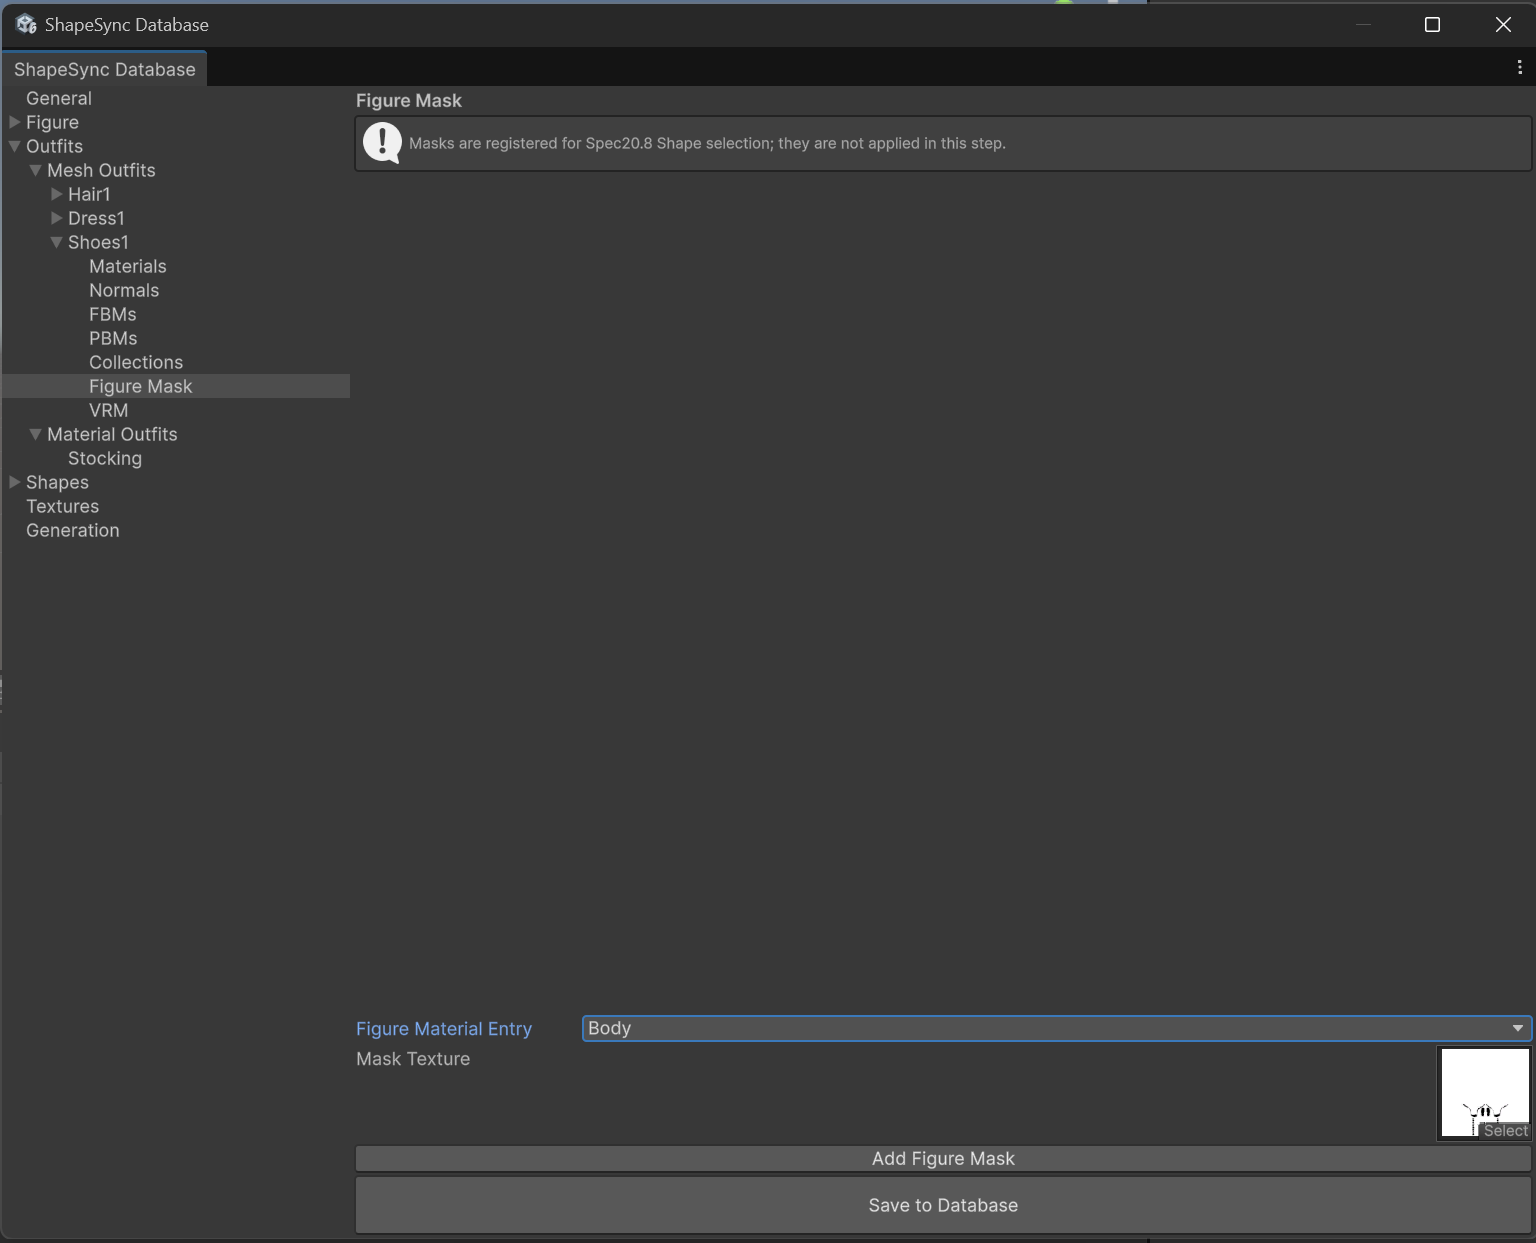 ▲Figure 8-6-1: Selecting Body in Figure Material Entry and specifying Shoes1Mask.png in Mask Texture
- Click the
Add Figure Maskbutton to add the registration row. - Click the
Save to Databasebutton at the bottom of the screen to save.
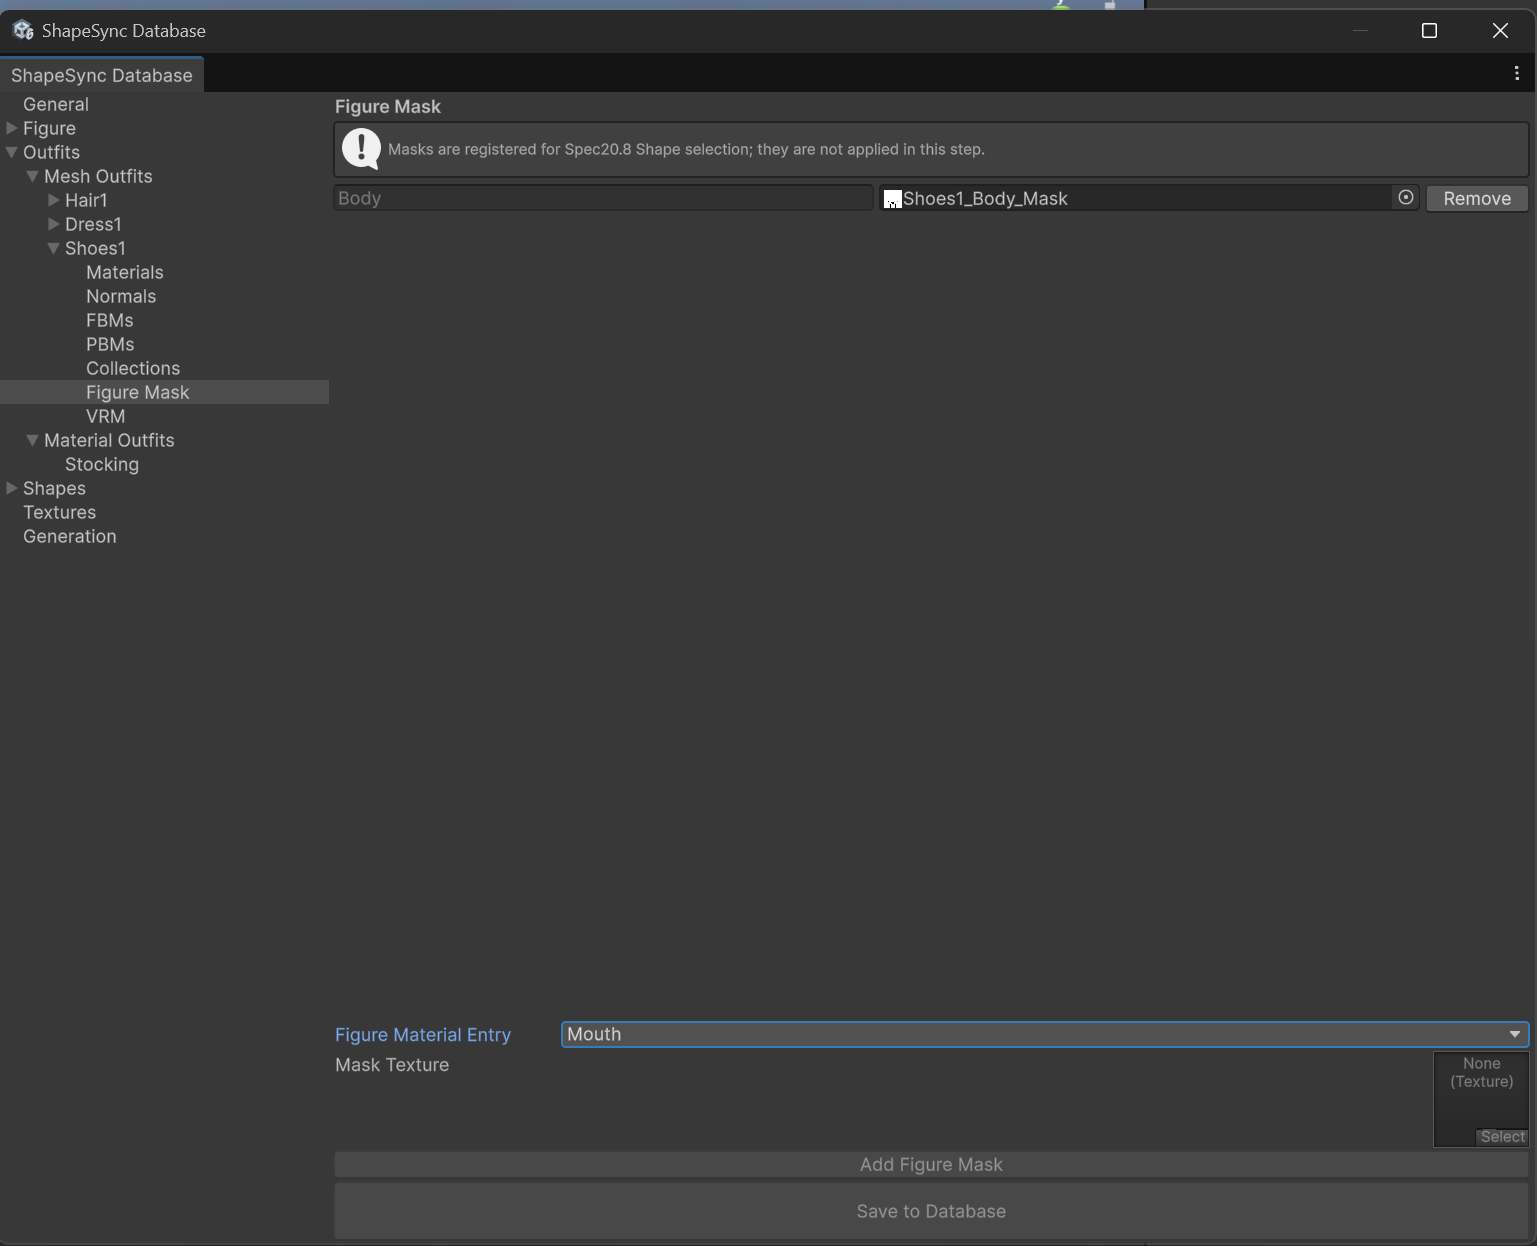 ▲Figure 8-6-2: Clicking Add Figure Mask to add Body - Shoes1_Body_Mask row, then saving with Save to Database
[!NOTE] Note Regarding Material Rows: In this tutorial model structure, base body skin is integrated into the
Bodymaterial, so registering 1 row is sufficient. However, for models where limbs or nails are split into separate materials, additional Figure Mask rows must be added for each material you wish to hide.
[!TIP] Registration in Textures Section: The mask image specified in Figure Mask is automatically registered as a Texture Resource owned by
Shoes1. Therefore, manually registering the mask image in ShapeSync Editor’sTexturessection is unnecessary.
4. Re-Executing Generate and Verifying Poke Resolution in Play Mode (Before / After)
Perform regeneration to apply the Figure Mask settings, and verify operation in Play Mode.
- Select the
Generationsection from the left TreeView in ShapeSync Editor. - Leaving each output setting as existing, click the
Generatebutton at the bottom of the screen. - If a folder selection dialog appears, select the existing output root folder (
Assets/ShapeSync/Generated), click “Select Folder”, and execute regeneration.
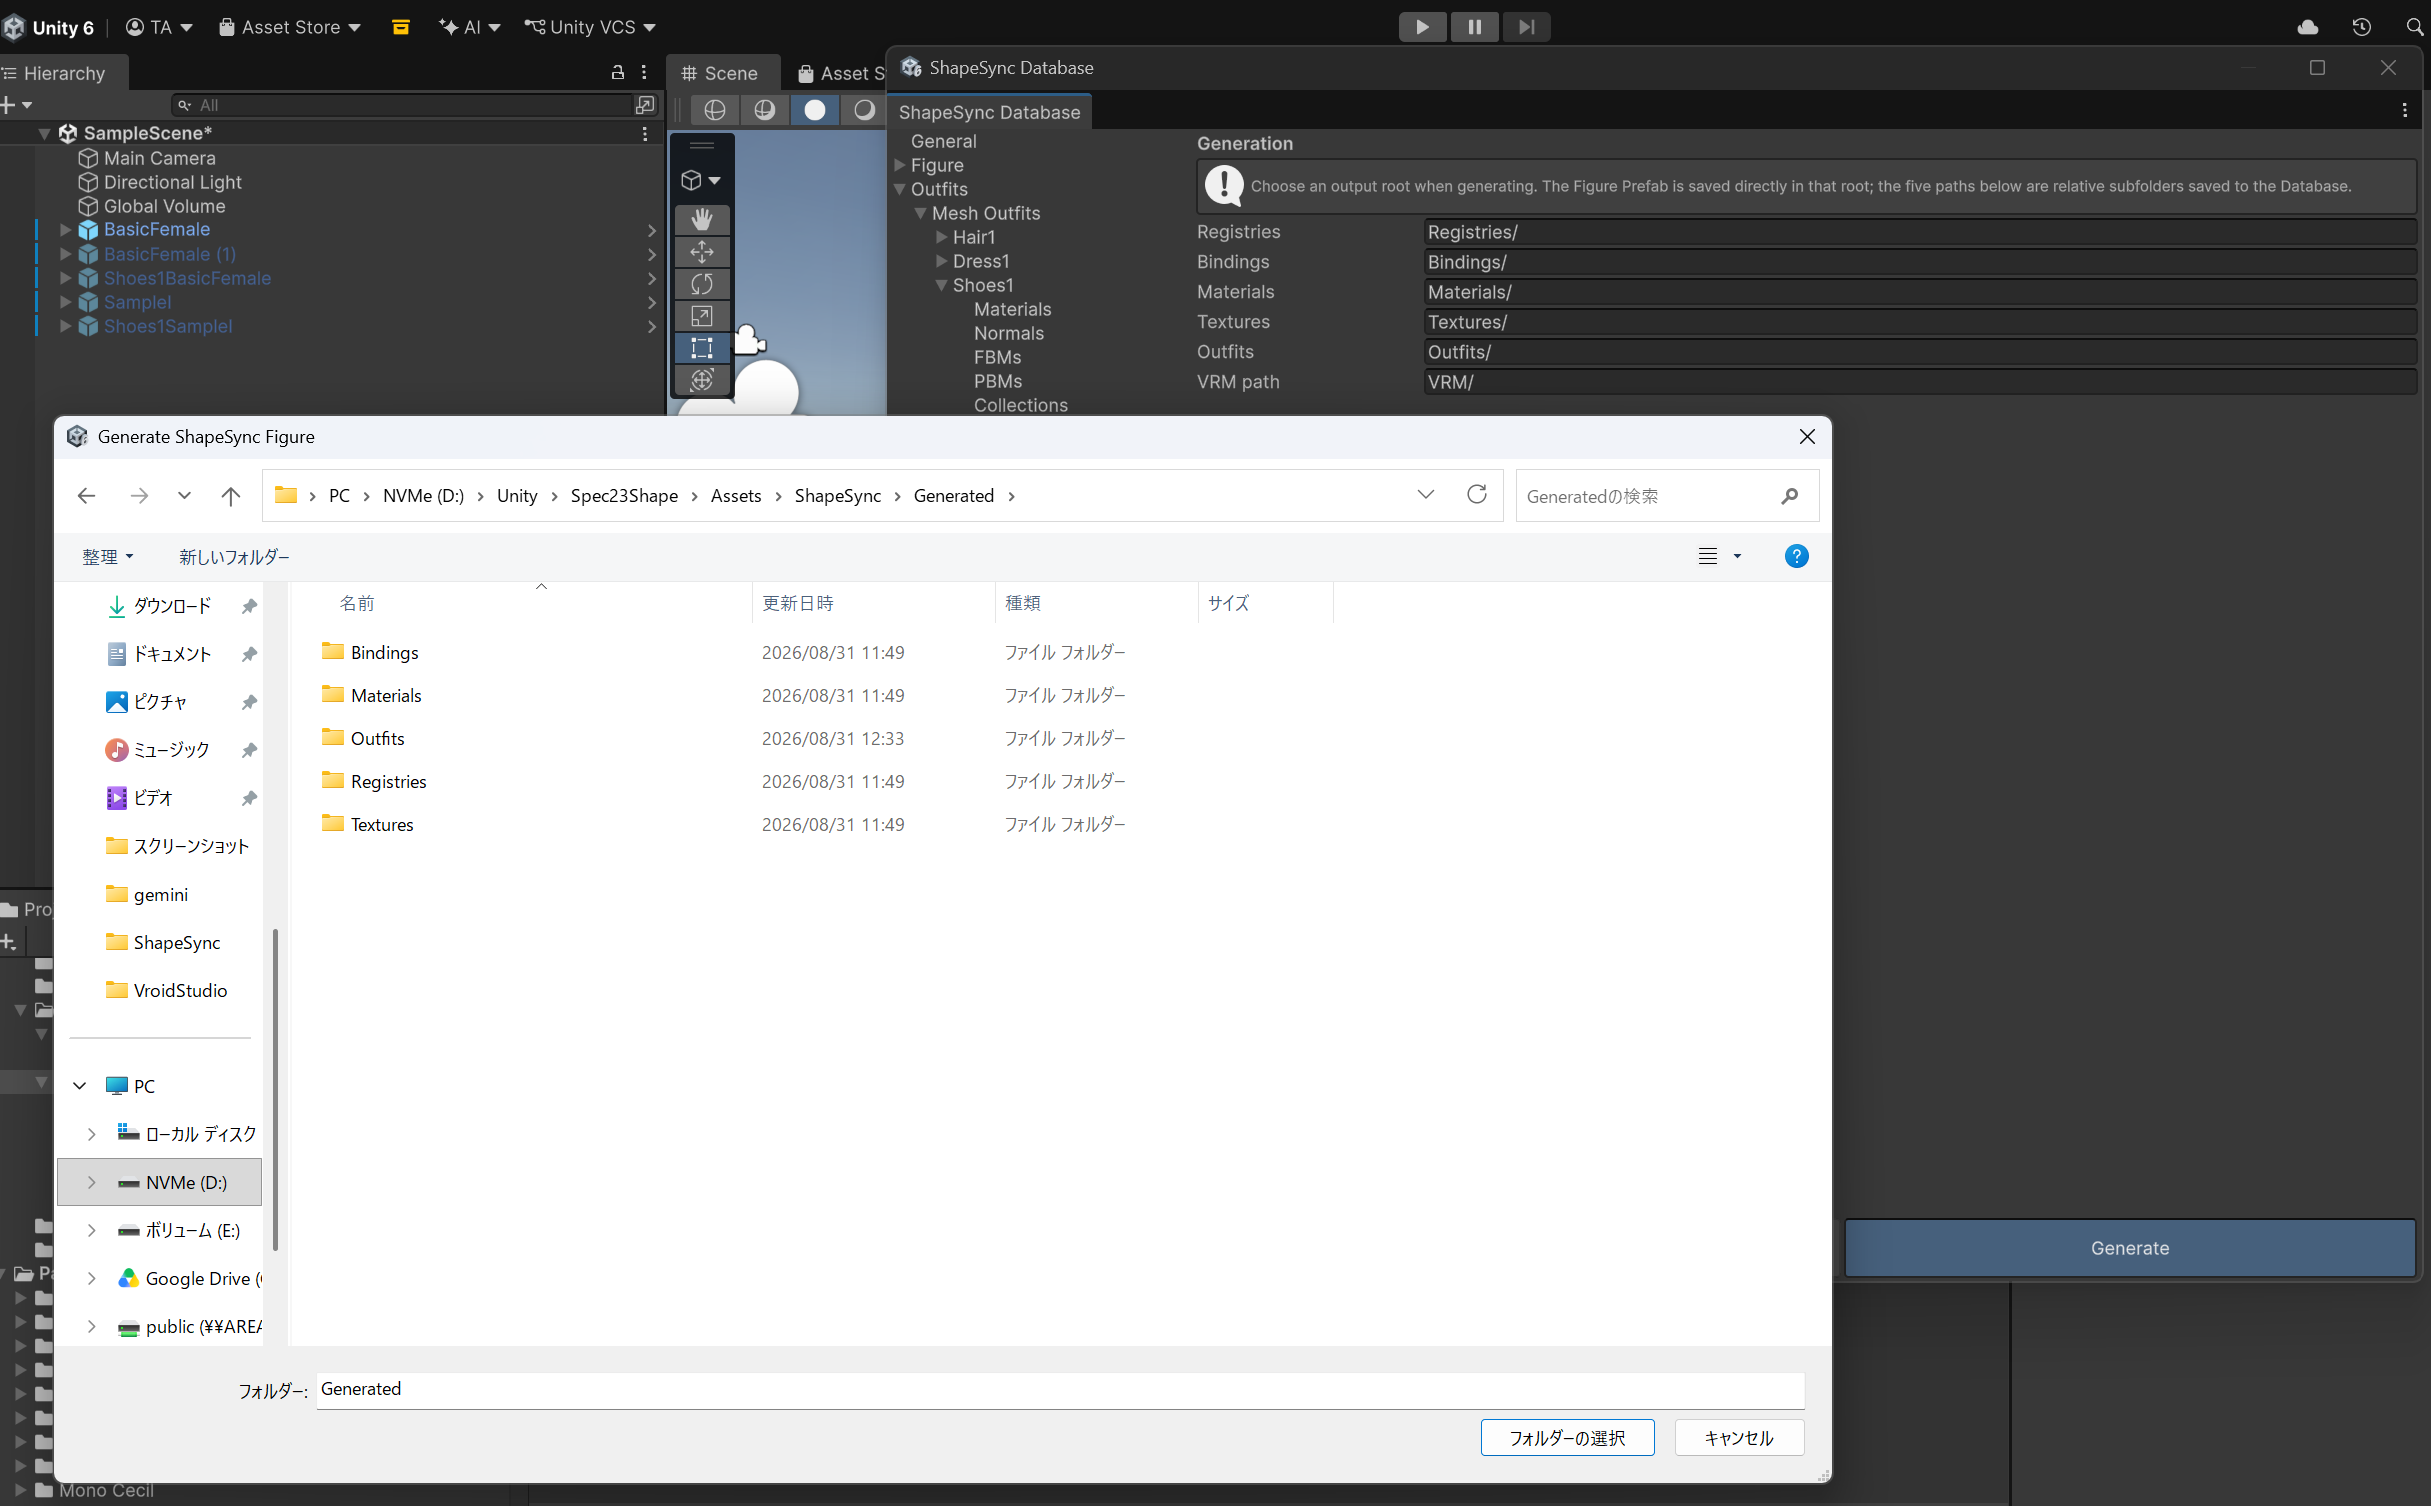 ▲Figure 8-7: Clicking Generate in Generation section, selecting output root folder (Generated), and executing regeneration
- Select the Figure (
BasicFemale) placed in the Scene. - Confirm that
outfitShoes1.assetregistered in the previous chapter remains set in theTemplate Listof Figure’sShapeDirector. - Press Unity’s Play button to enter Play Mode.
- Zoom in on the feet during walking animation playback. Confirm that the toe protrusion (Poke) identified in Chapter 7 has been completely eliminated and the feet fit cleanly inside the shoes (After).
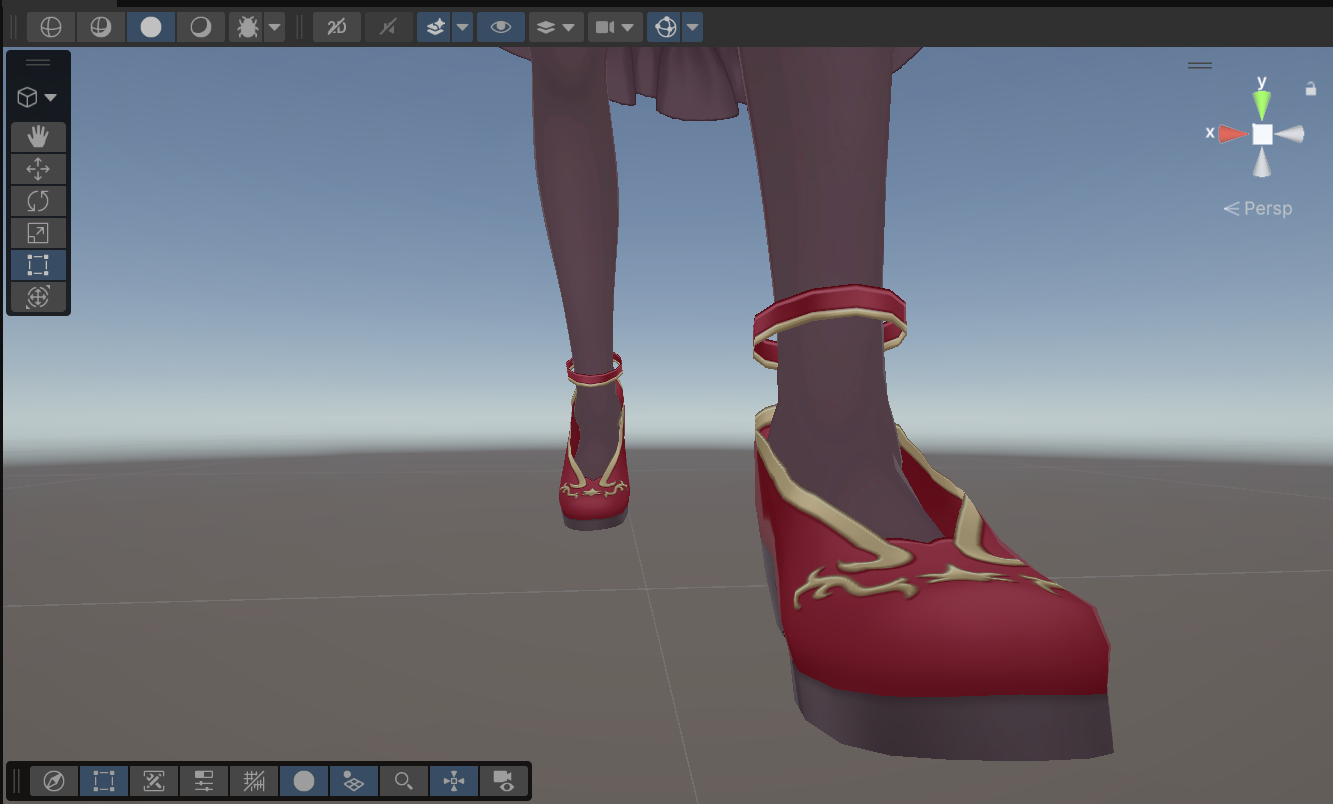 ▲Figure 8-8-1: During walking animation playback in Play Mode, toe Poke is completely resolved and fits cleanly into shoes (After)
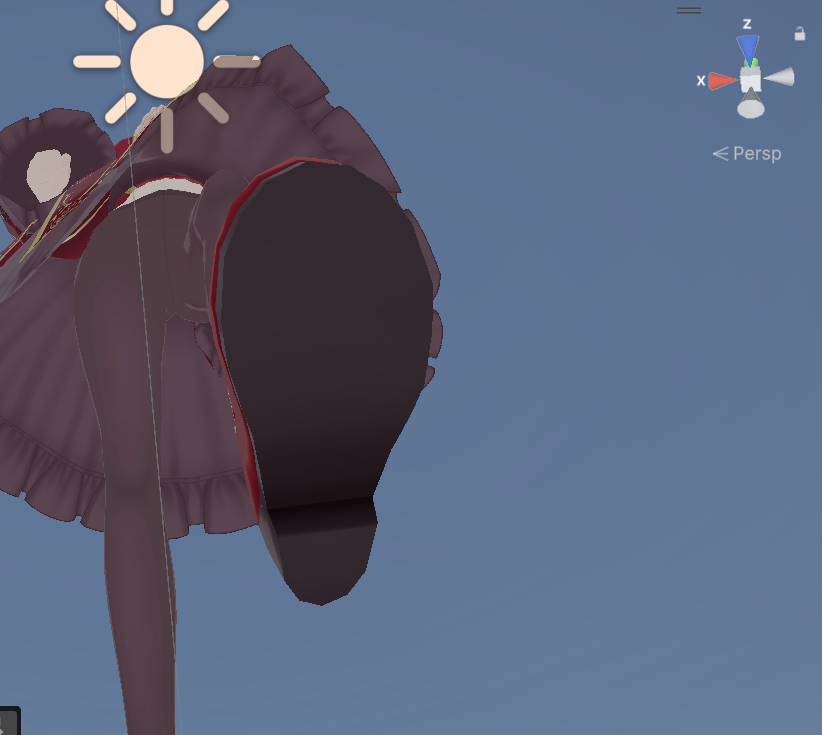 ▲Figure 8-8-2: Verification from beneath dress and sole side. Protrusion from sole is also cleanly resolved (After)
5. Common Issues and Solutions (Troubleshooting)
Q1. Toe protrusion (Poke) does not disappear upon entering Play Mode
- Cause:
- You may not have saved via
Save to Databaseafter clickingAdd Figure MaskinShoes1 > Figure Mask. - You may not have executed
Generate(re-generation) inGenerationof ShapeSync Editor after configuring Figure Mask.
- You may not have saved via
- Solution:
Confirm that the
Bodyrow is saved inShoes1 > Figure Mask, and always re-executeGeneratein theGenerationsection.
Q2. Ankles or legs other than shoes disappear and become transparent
- Cause:
In the mask image (
Shoes1Mask.png) created in VRoid Studio, the black (#000000) painted area may have extended beyond the shoe boundary up to the ankle or upper leg. - Solution:
Open the mask layer in VRoid Studio, repaint the ankle and leg areas exposed outside the shoes with white (#FFFFFF), export to
Assets/Texture/Shoes1Mask.pngagain, and re-executeGeneratein ShapeSync Editor.
← Back to Tutorial Index | ← Chapter 7: Advanced Outfit Registration and Collection (Shoe Deformation and Alignment)